I still remember the day I ruined my grandmother's famous chocolate cake by accidentally using salt instead of sugar — the look on my family's faces was priceless, but that kitchen disaster led me down a path of discovery that would change my baking life forever. You see, after that humiliating experience, I became obsessed with finding a foolproof cake recipe that even I couldn't mess up, something that would forgive my wandering mind and clumsy hands. That's when I stumbled upon this creamy yogurt cake, and let me tell you, it was like finding the holy grail of desserts in my own kitchen.
The first time I made this cake, I was skeptical — how could something so simple, with ingredients I already had in my fridge, create something so incredibly moist and tender that it practically melts on your tongue? But as I whisked the yogurt into the batter and caught that first whiff of vanilla and lemon zest dancing through my kitchen, I knew I was onto something special. The batter looked like liquid silk, and when it baked up into this golden dome that puffed proudly in the oven, I actually did a little victory dance right there on my kitchen tiles.
What really sold me was watching my notoriously picky nephew devour three slices in a row, completely silent except for the occasional "mmm" that escaped between bites. When a nine-year-old who normally won't eat anything that isn't neon-colored or shaped like a dinosaur voluntarily asks for seconds (and thirds) of a homemade yogurt cake, you know you've struck culinary gold. The texture is unlike any cake you've had — it's got this incredible density that somehow manages to be feather-light, with a tang from the yogurt that keeps every bite interesting and prevents that cloying sweetness that makes most cakes feel like a chore to finish.
I'm about to share my perfected version with you, complete with all the tricks I've learned through trial and error (mostly error, if we're being honest). This isn't just another yogurt cake recipe floating around the internet — this is the one that will make you famous among your friends, the one you'll be asked to bring to every potluck, the one that will have people texting you at midnight asking for the recipe. Let me walk you through every single step — by the end, you'll wonder how you ever made it any other way.
What Makes This Version Stand Out
I've tried dozens of yogurt cake recipes over the years, and most of them taste like someone took a regular cake and just added yogurt as an afterthought — bland, boring, and forgettable. This version is different, and here's exactly why you'll never need another yogurt cake recipe again.
Pure Yogurt Power: Instead of using yogurt as just another wet ingredient, this recipe builds the entire structure around it. The yogurt doesn't just add moisture — it creates this incredible tangy backbone that makes every bite taste like sunshine and lazy Sunday mornings. You'll notice the difference immediately when you take that first forkful and your taste buds do a little happy dance.
Texture That Defies Physics: Somehow this cake manages to be both dense and airy at the same time, like a cheesecake and sponge cake had a beautiful baby. The edges get these delicate, almost crispy corners while the center stays impossibly creamy and tender. It's the kind of texture that makes people close their eyes when they eat it because their brain needs to focus all its attention on processing the deliciousness.
Foolproof Simplicity: Most cake recipes require you to cream butter and sugar until they're "light and fluffy" — whatever that means — or fold ingredients with the delicacy of a brain surgeon. Not this one. You literally throw everything in one bowl, whisk it up, and pour it in a pan. Even my friend who once managed to burn water couldn't mess this up, and that's saying something.
Flavor That Builds: The combination of vanilla and lemon zest creates this flavor profile that unfolds as you eat it. First you get the warm hug of vanilla, then the bright pop of citrus cleanses your palate, and finally the tangy yogurt brings everything together in perfect harmony. It's like a three-act play happening in your mouth, and trust me, you'll want front row seats for every performance.
Make-Ahead Magic: Unlike most cakes that start drying out the moment they cool, this one actually gets better overnight. The flavors meld and deepen, the texture becomes even more luxurious, and you can slice it thinner without it crumbling apart. I always make it the day before I need it, which means less stress and more time to focus on important things like what wine pairs best with cake for breakfast.
Universal Crowd-Pleaser: I've served this to toddlers who refuse vegetables, teenagers who live on processed snacks, grandparents who swear nothing's as good as the old recipes, and food snobs who claim they don't eat dessert. They've all asked for seconds. It's the Switzerland of desserts — neutral territory where everyone can agree on its deliciousness.
Alright, let's break down exactly what goes into this masterpiece...
Inside the Ingredient List
The Flavor Base
Plain yogurt is the star of this show, and not just any yogurt will do — you need the full-fat, thick, creamy stuff that coats your spoon like velvet. Greek yogurt works beautifully here, but regular plain yogurt creates an even more tender crumb because it's slightly looser and incorporates more air. Whatever you do, don't reach for flavored yogurt unless you want your cake to taste like a children's vitamin — the artificial flavors will clash with everything good happening here. If all you have is Greek yogurt and you're craving this cake right now, thin it with a tablespoon of milk and you'll be good to go.
Granulated sugar provides the sweet structure, but it's doing more than just making things sweet — it's creating the delicate crust on top that shatters like thin ice when you slice into it. The sugar also helps keep the crumb moist by attracting and holding onto water molecules, which is why this cake stays fresh for days while other cakes turn into sad, dry bricks. If you're feeling fancy, you can swap out a quarter cup of white sugar for brown sugar, which adds a subtle caramel note that makes people ask "what's that amazing flavor?"
The Texture Crew
Three large eggs are the binding force that holds this whole operation together, but they're also secretly adding richness and that gorgeous golden color that makes this cake look like it's been kissed by the sun. The proteins in the eggs create the structure that allows this cake to rise without collapsing, while the yolks add fat for tenderness. Don't even think about using egg substitutes here — this is one ingredient where the real deal matters, and your taste buds will absolutely know the difference.
Vegetable oil is my secret weapon for creating the most impossibly moist cake you've ever tasted. Unlike butter, which firms up when cold, oil stays liquid at room temperature, meaning every bite is as tender as the first even days later. I use a neutral oil like canola or grapeseed, but if you want to get fancy, a mild olive oil adds this incredible fruitiness that makes grown adults make embarrassing happy noises. Just stay away from coconut oil unless you want your cake to taste like a tropical vacation.
The Unexpected Star
All-purpose flour forms the backbone, but the real magic comes from the cornstarch I've added to the mix. This little addition is what creates that impossibly tender, almost velvety texture that makes people close their eyes when they eat it. The cornstarch interferes with gluten development in the most delightful way, ensuring your cake stays tender even if you accidentally overmix it a bit. It's like having baking insurance that guarantees success every single time.
Baking powder provides the lift, but I've calibrated the amount specifically to work with the acidity of the yogurt. Too much and your cake tastes metallic, too little and it bakes up dense and sad. The two teaspoons here create the perfect balance — enough rise to keep things light, but not so much that you lose that signature creamy density that makes this cake special.
The Final Flourish
Vanilla extract might seem basic, but please don't use the cheap imitation stuff here — this cake is simple enough that every ingredient needs to pull its weight. Good vanilla adds these warm, complex notes that make people feel comforted and nostalgic, even if they've never had this cake before. If you really want to blow minds, scrape in the seeds from half a vanilla bean — those little black specks are like caviar for bakers, and they make everyone think you're a pastry wizard.
Lemon zest is the secret handshake that separates good bakers from great ones. Just the thin yellow outer layer — no white pith, which tastes bitter like regret — adds bright, sunny notes that wake up all the other flavors. The oils in the zest contain all the perfume of the lemon without the harsh acidity of the juice, creating this ethereal quality that makes people ask if you used some exotic ingredient they can't identify.
Everything's prepped? Good. Let's get into the real action...
The Method — Step by Step
- Preheat your oven to 350°F (175°C) and position the rack in the center — this is crucial for even baking. While the oven heats, grab a 9-inch springform pan and butter it generously, then dust with flour, tapping out the excess. Don't use cooking spray here — butter creates a delicate crust on the outside of your cake that adds incredible flavor. If you don't have a springform pan, a regular cake pan works, but you'll need to line the bottom with parchment paper and accept that your presentation won't be quite as stunning.
- In a large bowl, whisk together the yogurt, sugar, and eggs until the mixture looks like sunshine in liquid form — smooth, glossy, and pale yellow. This step is about more than just mixing; you're dissolving the sugar into the yogurt so it bakes evenly without creating a gritty texture. Take your time here and really whisk it well for about a full minute — your arm might get tired, but this is where the magic begins. The mixture should ribbon off your whisk and pool in the bowl like thick cream.
- Drizzle in the vegetable oil while whisking constantly — this creates an emulsion that keeps the cake tender and moist. Think of it like making mayonnaise; you're forcing oil and water-based ingredients to play nicely together. The batter will become even silkier and more luxurious, coating the whisk like liquid velvet. Don't rush this step — a slow, steady stream while you whisk continuously ensures the oil incorporates fully instead of separating later.
- Add the vanilla extract and lemon zest, giving everything a good whisk to distribute those flavor bombs evenly. Take a moment to appreciate how good your kitchen smells right now — that perfume of vanilla and citrus is what happiness smells like. The zest should break up into tiny flecks that will distribute throughout the cake, creating little bursts of brightness in every bite. If you're using vanilla bean paste instead of extract, now's the time to watch those gorgeous little black specks swirl through your batter.
- In a separate bowl, whisk together the flour, cornstarch, baking powder, and salt — this ensures the leavening distributes evenly so you don't get weird pockets of rise or flat spots. The cornstarch will disappear into the flour, but trust that it's there, working its tenderizing magic. Give it a good whisk for about 30 seconds — this step eliminates any lumps and aerates the flour slightly, which contributes to the cake's light texture. Think of this as insurance against dense, heavy cake syndrome.
- Sift the dry ingredients into the wet mixture in two additions, folding gently with a spatula after each addition. This is where most people go wrong — they stir like they're trying to mix concrete, developing the gluten and creating tough, rubbery cake. Instead, use a gentle folding motion, cutting through the batter and lifting it over itself. The batter should be thick but pourable, like Greek yogurt that's been left out for a few minutes. Some small lumps are perfectly fine — they'll bake out, and overmixing is your enemy here.
- Pour the batter into your prepared pan and smooth the top with your spatula, creating a gentle dome in the center. This dome helps the cake bake evenly and prevents the dreaded sinkhole in the middle. Give the pan a few gentle taps on the counter to release any trapped air bubbles — you'll see them rise to the surface and pop satisfyingly. The batter should fill the pan about two-thirds full, leaving room for the cake to rise without overflowing.
- Bake for 35-40 minutes, but start checking at 30 minutes — every oven is different, and this cake is too good to risk overbaking. You'll know it's done when the top is golden brown and springs back lightly when touched, and a toothpick inserted in the center comes out with just a few moist crumbs. The edges will start pulling away from the sides of the pan, and your kitchen will smell like a French bakery had a baby with a yogurt shop. Don't open the oven door for the first 25 minutes, or you risk the cake collapsing in on itself like a bad soufflé.
- Let the cake cool in the pan for 10 minutes — this is crucial for the structure to set. Run a thin knife around the edge to loosen it, then release the springform and let it cool completely on a wire rack. If you try to remove it too early, it might break apart, and while broken cake still tastes incredible, it's not quite the elegant presentation we're going for. The waiting is the hardest part, but good things come to those who practice patience.
That's it — you did it. But hold on, I've got a few more tricks that'll take this to another level...
Insider Tricks for Flawless Results
The Temperature Rule Nobody Follows
Here's something that'll change your baking life forever: ingredients at different temperatures don't play well together, and this cake is no exception. When your cold yogurt hits room temperature eggs and oil, it can cause the mixture to seize up and look curdled — not the smooth, emulsified batter we're after. Take everything out of the fridge 30 minutes before you start, or if you're impatient like me, give the yogurt a quick 10-second zap in the microwave. Your batter will come together like silk, and your cake will have that perfect, even crumb that makes professional bakers weep with joy.
Why Your Nose Knows Best
Forget timers — your nose is the most reliable indicator of when this cake is perfectly baked. When you start smelling that incredible aroma of vanilla and lemon wafting through your kitchen, that's your cake telling you it's almost ready. This usually happens about 5 minutes before the timer goes off, and it's your cue to start checking for doneness. A friend once told me she sets three timers because she doesn't trust herself, but honestly, trust your senses — they've been evolving for millions of years specifically to tell you when cake is ready.
The 5-Minute Rest That Changes Everything
After your cake comes out of the oven, let it rest in the pan for exactly 5 minutes — no more, no less. Too short and it'll fall apart when you try to remove it; too long and it'll steam itself into a soggy mess. During these crucial 300 seconds, the proteins are setting and the structure is stabilizing. Use this time to clean your whisk and bowl, because by the time you're done, your cake will be ready to release from its pan like a butterfly emerging from a chrysalis.
The Overnight Magic Trick
This cake is one of those rare desserts that actually improves overnight, developing deeper flavors and an even more luxurious texture. Wrap it tightly in plastic wrap while it's still slightly warm — the residual steam keeps it incredibly moist. The next day, the yogurt flavor becomes more pronounced and complex, while the lemon zest distributes more evenly throughout. I always make this cake at least a day ahead when I'm serving it to company, which also happens to eliminate the stress of day-of baking.
Creative Twists and Variations
This recipe is a playground. Here are some of my favorite ways to switch things up:
The Mediterranean Dream
Replace half the lemon zest with orange zest and add a tablespoon of honey to the batter. The honey creates these incredible caramelized edges while the orange gives it a sophisticated complexity that transports you straight to a Greek island. Top it with a dollop of Greek yogurt mixed with a drizzle of honey and some toasted walnuts — it's like dessert and breakfast had a beautiful, Mediterranean baby.
The Chocolate Swirl Edition
Melt 3 ounces of good dark chocolate and let it cool slightly. Pour half your batter into the pan, drizzle the chocolate over it, then add the remaining batter. Use a skewer to create beautiful chocolate marbling throughout. The bitterness of the chocolate creates an incredible contrast with the tangy yogurt base — it's like black and white photography, but for your taste buds.
The Spiced Autumn Version
Add a teaspoon of cinnamon, half a teaspoon of cardamom, and a quarter teaspoon of nutmeg to your dry ingredients. The warm spices pair beautifully with the yogurt's tang, creating a cake that tastes like autumn in New England. This version is particularly incredible served slightly warm with a scoop of vanilla ice cream melting into all the nooks and crannies.
The Berry Burst Creation
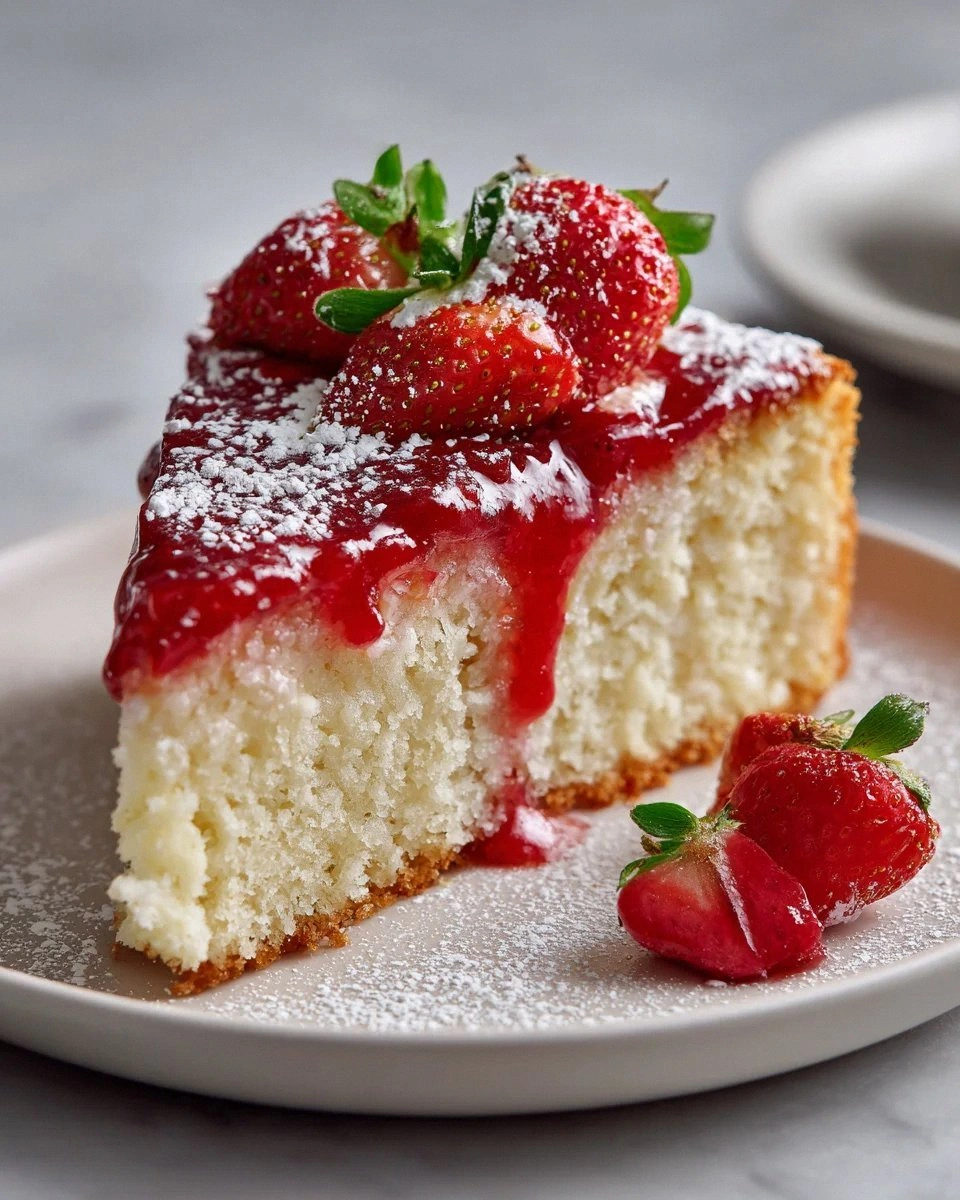
Gently fold a cup of fresh blueberries or raspberries into the finished batter right before pouring it into the pan. The berries burst during baking, creating pockets of jammy fruit throughout the cake. Dust the top with powdered sugar after it cools — it looks like the cake is wearing a delicate snow blanket, and the visual drama is almost as impressive as the flavor.
The Boozy Brunch Cake
Add two tablespoons of your favorite liquor to the batter — Grand Marnier for sophistication, Amaretto for nuttiness, or dark rum for Caribbean vibes. The alcohol burns off during baking, leaving behind complex flavors that make people ask for your secret. This version is perfect for brunch because it feels indulgent without being inappropriate for morning consumption.
The Tropical Escape
Replace the lemon zest with lime zest and add half a cup of toasted coconut to the batter. The lime gives it a bright, tropical zing while the coconut adds texture and that vacation vibe that makes everyone smile. Serve it with a dollop of coconut whipped cream and you'll swear you can hear steel drums playing in the distance.
Storing and Bringing It Back to Life
Fridge Storage
This cake keeps beautifully in the fridge for up to 5 days — wrap it tightly in plastic wrap, then pop it into an airtight container. The cold actually helps the flavors meld together even more, creating something akin to a yogurt cheesecake hybrid. Let it come to room temperature for 30 minutes before serving, or enjoy it cold straight from the fridge on a hot summer day when you need something refreshing and indulgent.
Freezer Friendly
Wrap individual slices in plastic wrap, then aluminum foil, and freeze for up to 2 months. This is brilliant for portion control (ha!) or for those emergency dessert situations that seem to happen more often than they should. Thaw overnight in the fridge, then let it sit at room temperature for 20 minutes before serving — it tastes almost as good as fresh, which is saying something for a frozen cake.
Best Reheating Method
If you prefer your cake slightly warm (and honestly, who doesn't?), wrap individual slices in foil and warm them in a 300°F oven for 8-10 minutes. Add a tiny splash of water to the foil packet before sealing — it steams back to that perfect, just-baked texture. Microwave works in a pinch, but it can make the edges tough, so use 50% power and heat in 15-second bursts until just warm.