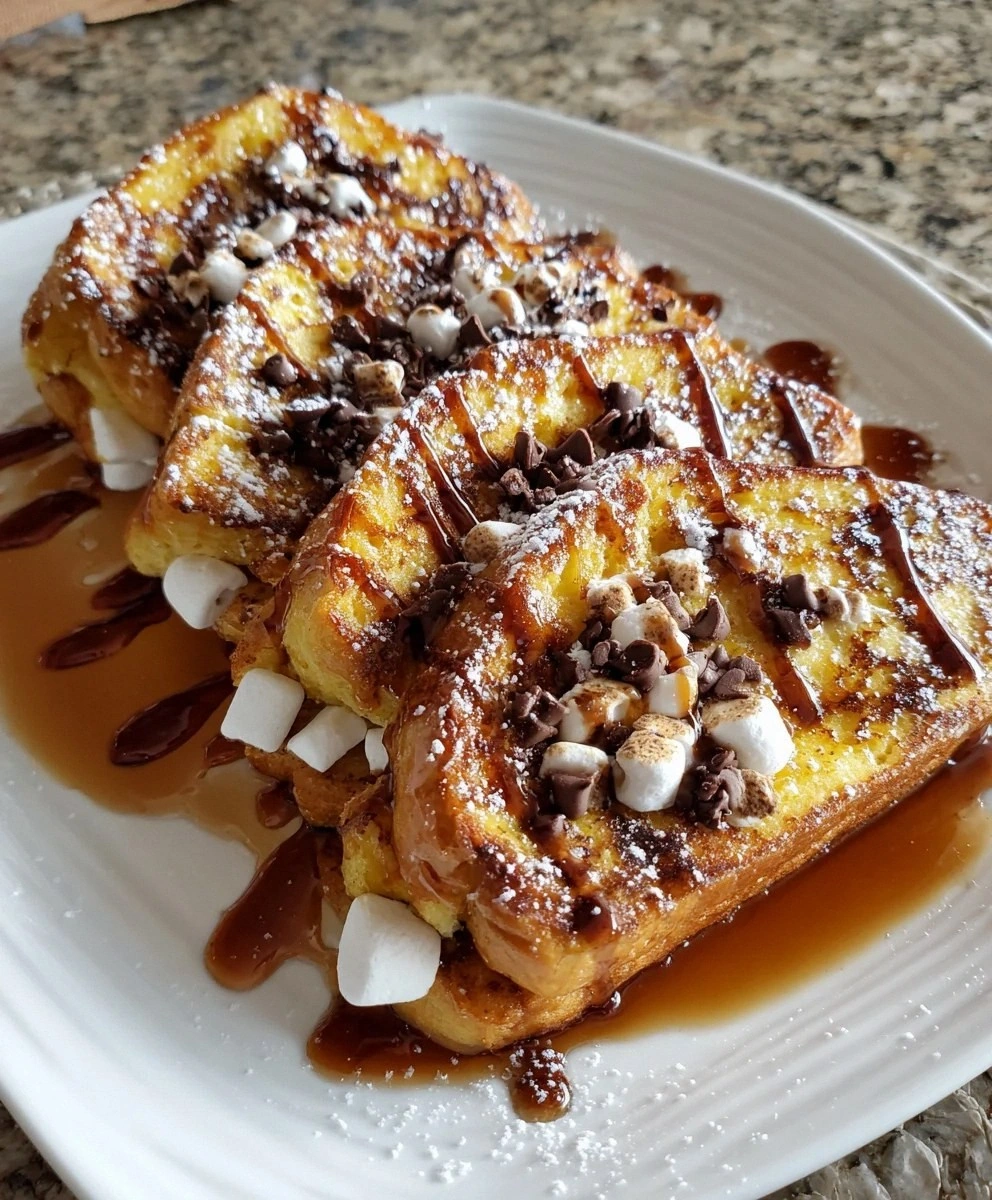
It was one of those Saturday mornings that felt like a dare from the universe: I had promised my nephew a campfire-worthy breakfast, yet the rain was drumming on the windows hard enough to rattle my coffee mug, the marshmallows in the pantry were suspiciously stale, and my brioche stash was down to the last two crusty heels. The kid looked at me with those big “Auntie can fix anything” eyes, so I did what any self-respecting sugar fiend would do—I raided the chocolate chips, pulverized a sleeve of graham crackers, and baptized the whole mess in my favorite custard base. Twenty minutes later, the first slice hit the sizzling butter and the kitchen filled with a smell so nostalgic I half expected a troop of scouts to march through the door. One bite—crispy, custardy, gooey, smoky, chocolate-oozy—and I knew I had accidentally created the breakfast equivalent of a summer campfire, minus the mosquito bites.
Picture this: thick, eggy brioche with a secret tunnel of melted chocolate and stretchy marshmallow, crusted in graham cracker dust that caramelizes into a thin, crackly shell. The edges are buttery and lacy, the center soft enough to make you close your eyes involuntarily, and every forkful delivers that campfire s’mores vibe even if you’re still in pajamas and it’s barely past eight o’clock. I dare you to taste this and not go back for seconds—actually, I double-dog dare you, because I ate half the batch before anyone else got to try it, and I’m not even sorry. If you’ve ever struggled with French toast that turns out soggy, bland, or tragically boring, you’re not alone—and I’ve got the fix. Stay with me here; this is worth every sticky, chocolate-smudged moment.
Most recipes get French toast completely wrong. They treat it like a last-minute sponge for stale bread instead of the custardy canvas it deserves to be. Here’s what actually works: a custard that’s rich enough to stand up to mix-ins, bread thick enough to stay proud under the weight of molten chocolate, and a finishing sear that gives you those campfire-kissed edges without a single charcoal briquette in sight. Okay, ready for the game-changer? We’re going to laminate the s’mores elements right between two slices, seal the edges, and dunk the whole package so the chocolate stays molten but doesn’t leak out like a dessert crime scene. Let me walk you through every single step—by the end, you’ll wonder how you ever made it any other way.
What Makes This Version Stand Out
Flavor Bomb: We’re not just sprinkling chocolate on top; we’re stuffing, soaking, and crusting every layer so you get campfire nostalgia in every bite.
Texture Playground: Crispy graham cracker shell, silky custard-soaked bread, molten chocolate core, and stretchy marshmallow threads—this is textural jazz.
Zero Campfire Required: Rainy day? Apartment kitchen? No problem. You’ll get the wood-smoke vibe from browned butter and toasted marshmallow, no tent pitching necessary.
Make-Ahead Magic: Assemble the sandwiches the night before, keep them in the fridge, then griddle them fresh while the coffee brews. Morning stress level: zero.
Visual Wow: When you cut that first slice, the chocolate oozes like slow-motion lava and the marshmallow stretches for days—perfect for brunch bragging rights.
Ingredient Honesty: No artificial “marshmallow flavor” or sad cocoa powder. Real mini marshmallows, real chocolate chips, real graham crackers—because you can taste integrity.
Speed Demon: From pantry raid to plated perfection in under thirty minutes, which means even the hangriest crowd won’t revolt.
Crowd Reaction: I served these at a book-club brunch and one friend literally clutched her chest and whispered, “I didn’t know breakfast could hug me back.”
Alright, let’s break down exactly what goes into this masterpiece...
Inside the Ingredient List
The Flavor Base
Eggs are the custards’ backbone, providing structure so your French toast doesn’t collapse into sad, eggy bread pudding. Whole milk adds silky richness without the heaviness of cream; skim milk is basically cloudy water here, so don’t insult your breakfast. Vanilla extract is the aromatic high-five that makes chocolate taste more chocolatey and marshmallows toastier, while cinnamon whispers campfire without stealing the show. A pinch of salt is the unsung hero that amplifies every sweet note and keeps the custard from tasting flat like grocery-store sheet cake.
The Texture Crew
Brioche is the Beyoncé of bread here—eggy, buttery, and willing to soak up custard without falling apart. Challah is a solid understudy if brioche is playing hard to get at the bakery. Thick slices (three-quarter-inch minimum) give you that plush interior; anything thinner turns into a limp handshake. Day-old bread is actually a blessing because stale starch slurps up custard like a sponge, preventing the dreaded soggy center. If your bread is fresh, dry the slices in a 250 °F oven for ten minutes and you’ve cheated time itself.
The S’mores Trinity
Chocolate chips should be semisweet so they melt into a velvety pool that’s not cloyingly sweet; milk chocolate can veer into candy-bar territory and hijack the dish. Mini marshmallows melt faster and more evenly than the giant ones, plus they create those Instagram-worthy stretchy strands without oozing out the sides. Graham cracker crumbs add a toasty honey-wheat note and a subtle crunch that plays beautifully against the custardy bread; skip them and you lose the campfire calling card.
The Final Flourish
Butter is non-negotiable for that golden crust; oil will give you color but none of the nutty, campfire aroma. Use unsalted butter so you control the seasoning, and let it brown just a hair for a whisper of smoke that screams outdoorsy vibes even if you’re still in bunny slippers.
Everything’s prepped? Good. Let’s get into the real action...
The Method — Step by Step
- Whisk together your custard base in a shallow bowl big enough to dip a sandwich. Crack two large eggs, add half a cup of whole milk, one teaspoon of vanilla extract, half a teaspoon of ground cinnamon, and a pinch of kosher salt. The mixture should look like liquid sunshine and smell like the best pancake Saturday of your childhood. Whisk until the eggs are fully incorporated and you see a light foam; those tiny bubbles mean air is trapped and will give you soufflé-like lift inside the bread.
- Lay out four thick slices of brioche and give them a gentle press with your palm; we want them sturdy but not squashed like a panini. On two of the slices, sprinkle two tablespoons each of semisweet chocolate chips, one tablespoon of mini marshmallows, and one teaspoon of your finely crushed graham crackers. Leave a half-inch border so the fillings don’t erupt like a chocolate volcano during cooking. Top with the remaining bread slices to form two plump sandwiches, then press the edges to seal—think of it as a sweet grilled cheese that’s keeping a secret.
- Pour the graham cracker crumbs onto a shallow plate. Drag each sandwich through the crumbs on both outer faces, pressing lightly so they adhere like savory glitter. Don’t flour the edges; you want those custard-soaked crusts to grab the crumbs and later caramelize into a crackly shell. If any spots look bald, patch them lovingly—this is breakfast armor.
- Heat a heavy skillet (cast iron if you’ve got it) over medium-low heat and add one tablespoon of unsalted butter. Swirl until the butter foams and just starts to smell nutty—this is the smoke signal that tells you it’s ready. Too hot and the crumbs burn before the custard cooks; too cool and you’ll get pale, soggy sadness. Listen for a gentle sizzle when you hover the sandwich above the pan; that’s the sound of future deliciousness.
- Lay the sandwiches in the pan and cook for three to four minutes per side. Resist the urge to press them with a spatula; we want puff, not pancakes. Peek after three minutes—the underside should be a deep amber with tiny freckles of darker brown. Flip once, gracefully, like you’re turning a page in a favorite novel. The second side usually cooks faster because the pan is hotter, so stay alert.
- During the last minute of cooking, sprinkle a pinch of extra chocolate chips on top; the residual heat will melt them into a glossy puddle that looks like dessert fondant. Remove the sandwiches to a cutting board and let them rest for two whole minutes—yes, the smell will torture you, but resting allows the custard to set so you don’t lose a chocolate landslide when you slice.
- Slice diagonally with a sharp knife—this isn’t just for looks; the angled cut exposes more gooey cross-section for that Instagram money shot. Serve immediately on warm plates so the butter you top them with melts into tiny rivers of gold. Add a light snowfall of powdered sugar if you’re feeling fancy, or just hand them over with forks and watch the room go quiet except for happy chewing noises.
That’s it—you did it. But hold on, I’ve got a few more tricks that’ll take this to another level...
Insider Tricks for Flawless Results
The Temperature Rule Nobody Follows
Medium-low is the sweet spot. I know you’re tempted to blast the heat so breakfast arrives faster, but high flames scorch the sugary crumbs before the custard inside cooks, leaving you with a bitter crust and raw middle. If you’re feeding a horde, keep the oven warm at 200 °F and park finished slices on a rack so air circulates; stacking them on a plate creates steam that sabotages your crispy edges.
Why Your Nose Knows Best
Browned butter smells like toasted hazelnuts and toasted marshmallows—when you catch that aroma, you have roughly thirty seconds before it tips into bitter burnt. Trust your olfactory alarm clock and flip or remove the toast immediately. A friend tried skipping this step once; let’s just say her smoke detector did the Macarena and the dog still hides when we say “French toast.”
The 5-Minute Rest That Changes Everything
After cooking, tent the toast loosely with foil but leave a vent for steam. Five minutes lets the chocolate relax so it stays molten but not volcanic, and the custard reabsorbs any loose moisture. Skip this and you’ll have chocolate lava racing off the plate like it’s late for a meeting.
Crust Insurance
If your graham crumbs refuse to stick, whisk a tablespoon of flour into the custard; the extra starch acts like glue and prevents bald spots. Gluten-free? Use a teaspoon of cornstarch instead—it works like culinary Velcro.
Spatula Confidence
Use a thin, flexible fish spatula for flipping; the offset angle slides under without disturbing the crust. Wiggle, don’t yank—think of it as coaxing a shy cat out from under the bed rather than performing a band-aid rip.
Creative Twists and Variations
This recipe is a playground. Here are some of my favorite ways to switch things up:
Peanut Butter Campfire
Slather the inside of the bread with a whisper-thin layer of peanut butter before adding chocolate and marshmallows. It melts into a Reese’s-like river that makes adults revert to happy kid noises. Use natural PB for less sugar and a nutty perfume that plays beautifully with cinnamon.
Banana Boat Edition
Add thin banana coins between the layers; they steam into custardy pockets that mimic banana-foster vibes. Bonus: the potassium makes you feel virtuous enough to justify a second slice.
Salted Caramel Drizzle
Swap half the chocolate chips for chopped soft caramels and finish with a flaky-salt sprinkle. The salt teases out the honey notes in graham crackers and keeps the sweetness from becoming one-note.
Spicy Mexican Hot Chocolate
Whisk a pinch of cayenne and a whisper of cinnamon into the custard. The gentle heat sneaks up like a plot twist and makes the chocolate taste deeper, darker, more mysterious.
Gluten-Free S’mores
Use thick-cut gluten-free Texas toast and gluten-free graham-style crumbs. The method stays identical, and honestly, my celiac friend says it’s the best thing she’s eaten since diagnosis.
Overnight Party Prep
Assemble the stuffed sandwiches, wrap tightly, and refrigerate overnight. In the morning, roll in fresh graham crumbs just before cooking so they stay crisp. Perfect for brunch hosts who want to pour mimosas instead of whisking custard under the bleary eyes of guests.
Storing and Bringing It Back to Life
Fridge Storage
Cool leftover slices completely, then stack in an airtight container with parchment between layers; they’ll keep for up to three days. Reheat in a dry skillet over medium-low for four minutes, flipping once—microwaves turn the crust rubbery and sad, and you deserve better.
Freezer Friendly
Flash-freeze individual slices on a tray, then bag them with parchment squares so they don’t fuse into a dessert brick. They’ll keep for two months. Reheat straight from frozen in a 375 °F oven for ten minutes, flipping halfway, until the centers are molten again.
Best Reheating Method
Add a tiny splash of water to the skillet and cover with a lid for the first minute; the steam revives the custardy interior while the direct heat resurrects the crispy shell. It’s like breakfast déjà vu—same swoon, zero loss.