I still remember the first time I attempted to make feta phyllo pockets at home. It was a disaster of epic proportions — the phyllo tore like tissue paper, the feta leaked everywhere, and I ended up with a baking sheet full of sad, soggy triangles that looked nothing like the golden, flaky parcels I'd devoured at my favorite Mediterranean restaurant. Fast forward three years and countless batches later, and I've cracked the code to creating what I confidently call the most irresistible feta phyllo pockets you'll ever taste outside of Greece itself.
Picture this: paper-thin phyllo sheets shattering like spun glass between your teeth, revealing a molten core of creamy feta that's been transformed into something almost ethereal. The cheese inside isn't just melted — it's whipped into a cloud-like filling that marries perfectly with the buttery, crispy exterior. The aroma that fills your kitchen while these bake is absolutely intoxicating, a heady mix of toasted butter, warm cheese, and the slightest hint of herbs that makes your neighbors knock on your door asking what smells so incredible.
What sets this recipe apart from every other feta phyllo concoction floating around the internet is the game-changing technique I've developed for handling the filling. Most recipes just crumble feta and call it a day, resulting in a grainy, often dry center that's more disappointment than delight. My method creates a lusciously smooth filling that stays creamy even after baking, thanks to a secret ingredient you'll never see coming. Trust me, once you try this version, you'll wonder why you ever settled for those sad, dry triangles that pass for appetizers at mediocre dinner parties.
Stay with me here — this is worth it. By the time we're done, you'll be folding phyllo like a Greek grandmother and pulling golden pockets of cheesy perfection from your oven that will make everyone think you've been secretly training in a Mediterranean kitchen. Let me walk you through every single step — by the end, you'll wonder how you ever made it any other way.
What Makes This Version Stand Out
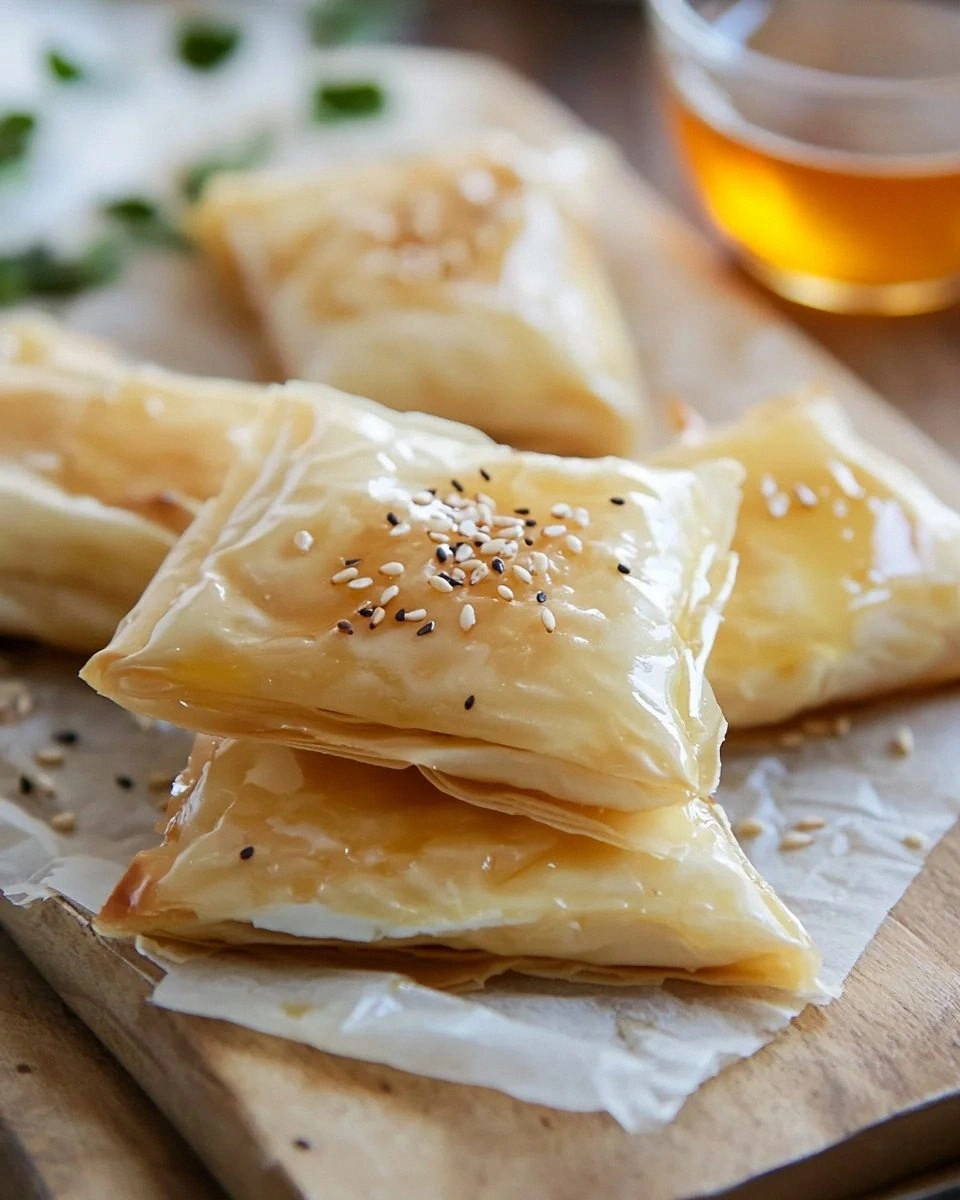
Cloud-Soft Filling: Unlike traditional recipes that use crumbled feta, we whip the cheese into a mousse-like consistency that stays impossibly creamy even after baking. The transformation is magical — what starts as crumbly cheese becomes a smooth, spreadable filling that oozes luxuriously when you break into the pocket.
Shatter-Crisp Exterior: The phyllo technique I've developed creates layers so delicate they crackle like thin ice under your fork, yet sturdy enough to hold their shape. We're talking about edges that brown to the perfect amber hue, creating a textural contrast that will make your taste buds sing.
Foolproof Assembly: Most recipes have you wrestling with dry, brittle phyllo that tears if you look at it wrong. My method uses a simple kitchen hack that keeps the sheets pliable and cooperative, eliminating the frustration that has sent many home cooks running from phyllo recipes forever.
Make-Ahead Magic: These pockets freeze beautifully, which means you can have restaurant-quality appetizers ready to bake at a moment's notice. I always keep a batch in my freezer for impromptu gatherings — just pop them in the oven and watch your guests' eyes light up.
Flavor Explosion: The filling isn't just feta — we layer in unexpected ingredients that amplify the cheese's natural tang while adding depth and complexity. Each bite delivers a symphony of savory notes that dance on your palate.
Visual Drama: These don't just taste incredible — they look stunning. The golden, flaky parcels stacked on a platter create an impressive presentation that screams "I know what I'm doing in the kitchen," even if you're a phyllo novice.
Universal Appeal: I dare you to find someone who doesn't love these. They're vegetarian but satisfying, sophisticated but approachable, impressive but surprisingly easy to execute. I've served them at everything from casual game nights to fancy dinner parties, and they disappear faster than anything else on the table.
Alright, let's break down exactly what goes into this masterpiece...
Inside the Ingredient List
The Foundation Squad
Phyllo dough is the star here, and not all sheets are created equal. I've tested every brand available in American supermarkets, and trust me, the difference between good and great phyllo is the difference between a recipe you'll make once and one you'll make forever. Look for brands that specify "extra thin" or "#7 thickness" — these create the most delicate, shatter-crisp layers. The sheets should feel almost weightless in your hands, like holding a whisper. If you can only find thicker varieties, don't panic — we can work with it, but adjust your expectations accordingly.
Greek feta is non-negotiable here, and I'm prepared to fight anyone who says otherwise. Bulgarian feta might be cheaper, French feta might be milder, but Greek feta has that perfect balance of salt and tang that makes these pockets sing. When shopping, look for blocks packed in brine rather than pre-crumbled — the brine keeps the cheese moist and flavorful. A good Greek feta should smell fresh and grassy, never sour or ammoniated. If you can find feta made from sheep's milk (traditional) rather than cow's, grab it — the flavor difference is remarkable.
The Texture Transformers
Cream cheese is my secret weapon for achieving that cloud-like filling consistency. Just two tablespoons per cup of feta transforms the texture from crumbly to creamy without dulling the flavor. Make sure it's full-fat and softened to room temperature — cold cream cheese will fight you every step of the way and create lumpy filling that no amount of mixing will fix.
Egg yolk might seem like an odd addition to a cheese filling, but hear me out — it acts as a natural emulsifier, binding the feta and cream cheese into a smooth, cohesive mixture. Plus, it adds richness and helps the filling set slightly during baking, preventing it from running out of the pockets like molten lava. Use room temperature egg yolks for the smoothest incorporation.
The Flavor Amplifiers
Fresh dill might seem like a background player, but it brightens the entire filling with its herbaceous notes. Dried dill is a sad substitute here — it tastes like hay and adds nothing but green flecks. Grab a fresh bunch, chop it finely, and watch how it transforms the filling from one-dimensional to complex and intriguing. The key is using just enough to enhance the feta without overwhelming it.
Lemon zest is another game-changer that most recipes completely overlook. Just a whisper of fresh zest cuts through the richness of the cheese and adds a subtle brightness that makes the flavors pop. Use a microplane for the finest zest — you want it to disappear into the filling, not create visible yellow specks that scream "I added lemon!"
The Final Flourish
Butter gets brushed between every layer, creating steam that separates the sheets into distinct, flaky layers. Use European-style butter if you can find it — the higher fat content creates more dramatic layers and better flavor. Clarified butter works too, but I prefer whole butter for the rich flavor it imparts to the finished pockets.
Olive oil spray might seem redundant when you're already using butter, but a light mist on the exterior before baking creates an even more golden, crispy finish. Choose a neutral-flavored oil rather than a robust extra virgin — we want the butter flavor to shine through, not compete with peppery olive notes.
Everything's prepped? Good. Let's get into the real action...
The Method — Step by Step
- Start by making your filling at least 30 minutes before assembly — this gives the flavors time to meld and the texture to stabilize. In a medium bowl, crumble your feta into small pieces, but don't pulverize it into dust. Add the softened cream cheese and use a fork to mash them together until you have a mostly smooth mixture with tiny flecks of feta still visible. This texture contrast is crucial — completely smooth filling tastes artificial and boring. Fold in the egg yolk, dill, and lemon zest until everything is homogenous, then cover and let it rest while you prep everything else.
- Now comes the part where most recipes go sideways — handling the phyllo. Unroll your package gently on a clean counter and immediately cover it with plastic wrap, then a barely damp kitchen towel. This two-layer protection prevents the sheets from drying out while keeping them from getting soggy. Work with about 6-8 sheets at a time, keeping the rest covered. If you've never worked with phyllo before, don't panic when you see tears — we can work around them, and honestly, a few tears add character to the final presentation.
- Clear a large workspace and set up your assembly line: melted butter in a small bowl with a pastry brush, your filling nearby, and a parchment-lined baking sheet for the finished pockets. Take one sheet of phyllo and lay it horizontally in front of you. Brush it very lightly with butter — you're aiming for a whisper-thin coating, not a heavy slather. Too much butter makes the layers greasy and prevents them from puffing properly. Place another sheet on top and repeat until you have a stack of 4-5 sheets.
- Using a sharp knife or pizza cutter, divide your stacked sheets into 3 long strips, cutting parallel to the short edge. Each strip should be about 3-4 inches wide — wide enough to hold filling but not so wide that your pockets become unwieldy. At the top of each strip, place about 2 teaspoons of filling. Don't overfill — tempting as it is, too much filling will burst through the phyllo during baking and create a mess. The filling should form a small log shape, leaving about 1/2 inch border on each side.
- Here's where the magic happens — folding these into perfect little parcels. Fold the top right corner down to meet the left edge, creating a triangle. Then fold this triangle down along its bottom edge, like folding a flag. Continue folding in this triangular pattern, maintaining tight, even folds that encase the filling completely. When you reach the end, tuck the final flap underneath to seal. This technique creates the classic triangular shape while ensuring no filling escapes during baking.
- Transfer your finished pockets to the prepared baking sheet, seam side down. They can be close together but shouldn't touch — they need room for hot air to circulate and create even browning. Once you've filled your first sheet, lightly spray the tops with olive oil spray, then brush with a whisper of melted butter. This double coating creates the most golden, crispy exterior that will make you weep with joy.
- Preheat your oven to 375°F (190°C) — this temperature is crucial. Too low and the phyllo will be pale and soggy; too high and it will burn before the inside heats through. Bake for 20-25 minutes, rotating the pan halfway through. You're looking for a deep golden brown color, almost amber, with edges that have pulled away slightly from the pan. That sizzle when you open the oven door? That's the sound of success.
- Resist the urge to dig in immediately — I know, I know, but trust me on this. Let them rest for 5 minutes on the pan. This brief pause allows the steam inside to redistribute, preventing the dreaded mouth-burn and letting the flavors settle. Plus, they actually taste better after a few minutes when the contrast between hot filling and warm exterior creates the perfect eating experience.
- Transfer to a serving platter and prepare for the onslaught of compliments. These are best served warm but not piping hot — the filling should flow like lava but not scorch your tongue. Garnish with a sprinkle of fresh dill or a few sesame seeds if you're feeling fancy, but honestly, they're so beautiful on their own that additional decoration feels like gilding the lily.
That's it — you did it. But hold on, I've got a few more tricks that'll take this to another level...
Insider Tricks for Flawless Results
The Temperature Rule Nobody Follows
Room temperature isn't just a suggestion — it's the difference between success and frustration. Cold feta won't blend smoothly with the cream cheese, resulting in a lumpy filling that tastes like you couldn't be bothered to try. Set your dairy out at least an hour before mixing; you'll be amazed how this simple step transforms the texture. The same goes for your egg yolk — cold yolk is reluctant to incorporate and can create little yellow flecks in your filling. Take the extra few minutes to let everything come to room temperature, and your filling will be silky smooth and perfectly homogenous.
Why Your Nose Knows Best
Forget timers — your nose is the best indicator of when these are done. When you start smelling toasted butter and warm cheese, check them immediately. This usually happens around the 18-minute mark, but ovens vary wildly. You're looking for a deep, nutty aroma that makes your mouth water involuntarily. If you can smell them from the living room, they're probably perfect. A friend tried skipping this step once — let's just say she served pale, doughy pockets that tasted like disappointment and broken dreams.
The 5-Minute Rest That Changes Everything
I cannot stress this enough — do not skip the resting period. I know they smell incredible and you're dying to taste your creation, but patience here is rewarded with pockets that hold their shape when you bite into them instead of collapsing into a cheesy mess. During those 5 minutes, the filling firms up slightly, the exterior crisps further, and the flavors meld into something greater than the sum of their parts. Set a timer and walk away if you must — your future self will thank you when you're serving perfectly intact triangles instead of sad, deflated ones.
The Butter Brushing Technique
Most recipes tell you to brush butter on phyllo like you're painting a house — thick, heavy strokes that saturate the sheets. This is completely wrong and results in greasy, heavy pockets. Instead, hold your brush almost parallel to the surface and use quick, light strokes. You should be able to see the phyllo through the butter — it should look barely kissed, not drenched. Think of it as applying perfume rather than sunscreen. This technique creates distinct, flaky layers that shatter beautifully when you bite into them.
The Storage Secret
If you're not serving immediately, store baked pockets in a single layer on a wire rack set over a baking sheet in a 200°F oven. This keeps them warm and crispy without drying them out. Covering them with foil creates steam that destroys the crisp exterior, while leaving them uncovered at room temperature makes them stale. The low oven method maintains that fresh-from-the-oven texture for up to an hour, perfect for dinner parties where timing is everything.
Creative Twists and Variations
This recipe is a playground. Here are some of my favorite ways to switch things up:
The Mediterranean Dream
Add 2 tablespoons of finely chopped sun-dried tomatoes and 1 teaspoon of dried oregano to your filling for a flavor that transports you straight to a Greek island. The tomatoes add a sweet-tart punch that plays beautifully against the salty feta, while the oregano provides that unmistakable Mediterranean herb note. These disappear faster than the original version at my dinner parties, if you can believe it.
The Spicy Surprise
Mince half a jalapeño (seeds removed for medium heat, left in for brave souls) and fold it into the filling with 1/4 teaspoon of smoked paprika. The gentle heat builds slowly, creating a pleasant warmth that makes people reach for their drinks in the best way. The paprika adds a subtle smokiness that makes these taste like they came from a wood-fired oven, even when baked in a regular kitchen.
The Everything Bagel Version
Replace the dill with 1 tablespoon of everything bagel seasoning mixed into the filling, then sprinkle more on top before baking. The garlic, onion, and sesame flavors create a breakfast-for-dinner vibe that kids absolutely love. Serve these with a side of marinara for dipping and watch them vanish faster than you can plate them.
The Sweet-Savory Twist
Add 1 tablespoon of honey and 1/4 teaspoon of cinnamon to your filling, then serve with a drizzle of hot honey on top. This Moroccan-inspired version bridges the gap between appetizer and dessert, creating a sophisticated flavor profile that impresses foodies and skeptics alike. The sweetness is subtle — just enough to make people ask "what's in these?" while reaching for another.
The Everything-Free Version
Need dairy-free? Substitute the feta with almond-based feta and use vegan cream cheese. Replace the egg yolk with 1 tablespoon of aquafaba. The result isn't identical, but it's surprisingly close and completely delicious. I've served these to vegans who couldn't believe they weren't eating the real thing — high praise from people who know their dairy alternatives.
The Breakfast Pocket
Add 1 tablespoon of maple syrup and 1/4 cup of cooked, crumbled breakfast sausage to the filling. These make incredible grab-and-go breakfasts that reheat beautifully in a toaster oven. The sweet-savory combination satisfies morning cravings while the protein keeps you full until lunch. Make a double batch on Sunday and you're set for the week.
Storing and Bringing It Back to Life
Fridge Storage
Unbaked pockets keep beautifully in the refrigerator for up to 24 hours. Arrange them in a single layer on a parchment-lined tray, cover loosely with plastic wrap, and refrigerate. When ready to bake, let them sit at room temperature for 15 minutes while your oven preheats. This brief rest prevents the cold from shocking the phyllo, ensuring even browning. Baked pockets will keep for 3 days refrigerated in an airtight container, but honestly, they're so good that I've never had them last more than 24 hours in my house.
Freezer Friendly
These freeze like champions — both before and after baking. For unbaked pockets, arrange them on a tray and freeze until solid, then transfer to freezer bags. They'll keep for 2 months and can be baked straight from frozen — just add 5-10 minutes to the cooking time. For baked pockets, cool completely, then freeze in a single layer before transferring to containers. Reheat in a 350°F oven for 10-12 minutes until heated through and crispy again. The texture isn't quite as perfect as fresh-baked, but it's remarkably close.
Best Reheating Method
Skip the microwave — it turns phyllo into rubber faster than you can say "kitchen disaster." Instead, use a toaster oven or regular oven at 350°F for 8-10 minutes. If they're frozen, don't thaw first — just add extra time. For small batches, a toaster oven works perfectly and preheats faster. The goal is to heat them through while recrisping the exterior. Serve immediately after reheating for the best texture and flavor.