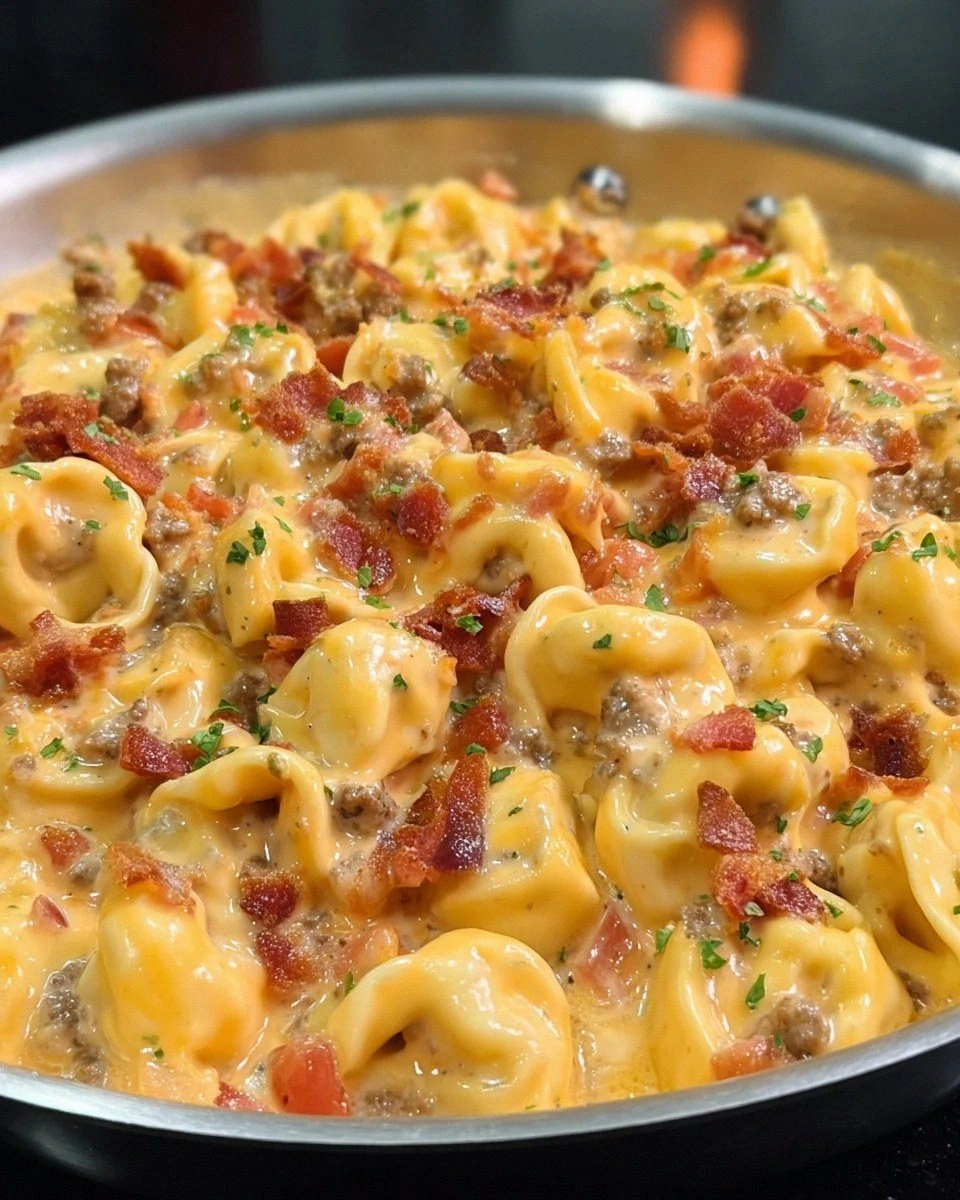
I still remember the glorious disaster that birthed this recipe. It was one of those frantic weeknights when the fridge held nothing but a half-eaten cheeseburger, some questionable tortellini, and a pack of bacon that was dangerously close to expiring. In my desperation to feed four hangry teenagers who were circling the kitchen like vultures, I threw everything into one pan and prayed to the culinary gods. The smell that wafted through my kitchen fifteen minutes later was so intoxicating that my neighbor actually knocked on my door to ask what I was making. That first bite was pure revelation — all the smoky, cheesy, beefy flavors of my favorite burger wrapped around those tender pasta pillows, with bacon adding its irresistible crunch and richness.
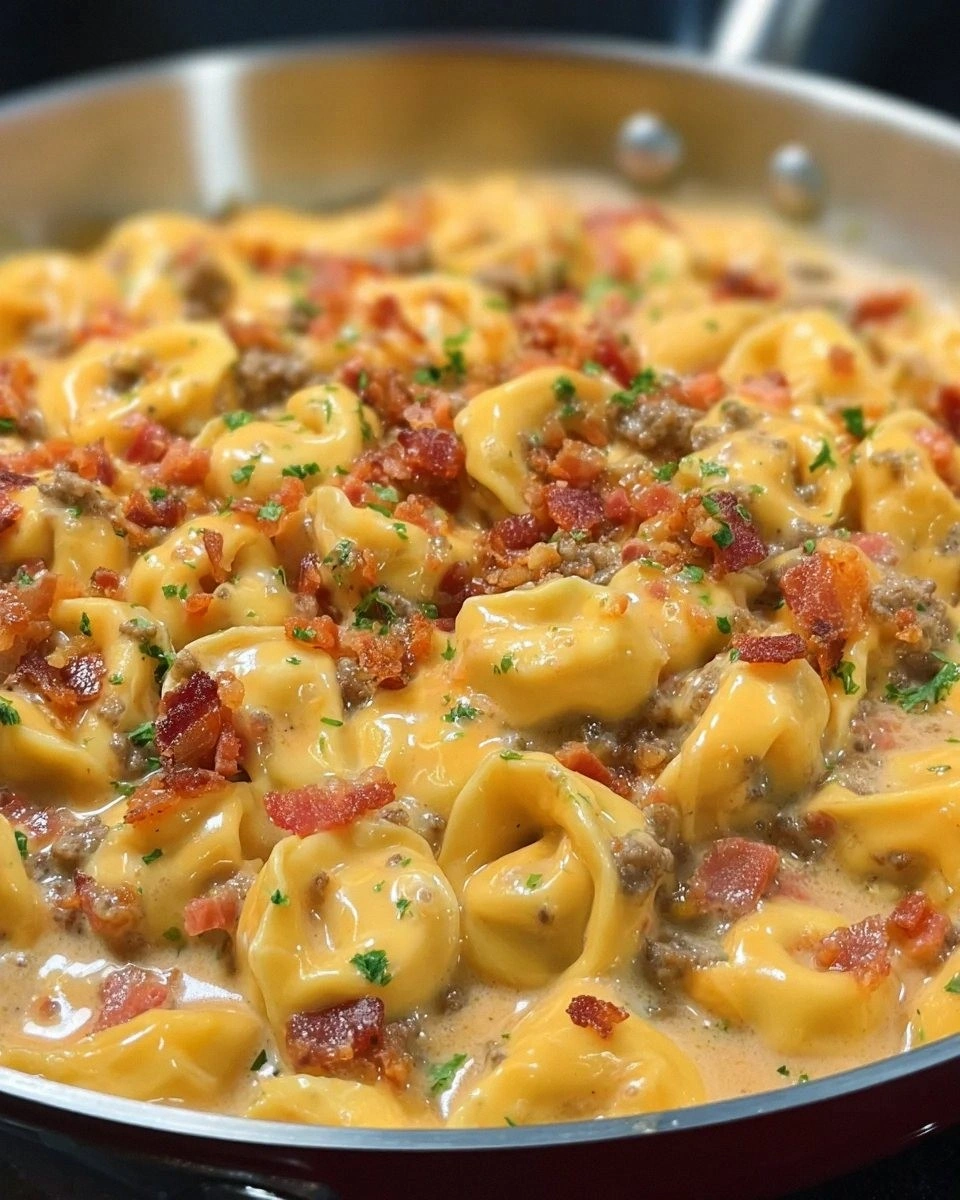
Picture this: golden-brown tortellini swimming in a silky sauce that tastes exactly like the best cheeseburger you've ever had, studded with crispy bacon bits that shatter like thin ice between your teeth. The aroma alone will have your family materializing in the kitchen, drawn by the siren song of beef, bacon, and melted cheese. I dare you to taste this and not go back for seconds — I've watched grown adults fight over the last spoonful like it was the final slice of pizza at a party. This isn't just another pasta dish; it's comfort food alchemy that transforms humble ingredients into something that'll make you close your eyes and sigh with every bite.
What makes this version stand leagues above every other "cheeseburger pasta" recipe out there? I'm talking about a technique that'll make you feel like a restaurant chef in your own kitchen, using ingredients you probably already have. Most recipes get this completely wrong — they just dump everything together and hope for the best. But here's what actually works: we build layers of flavor the same way you'd craft the perfect burger, starting with properly rendered bacon fat that becomes the foundation for everything else. Stay with me here — this is worth it. By the time you're done, you'll wonder how you ever settled for bland, one-note pasta dishes.
Okay, ready for the game-changer? We're going to use the bacon drippings to toast our tortellini before saucing them, creating these incredible crispy edges that hold onto every drop of our cheeseburger-inspired sauce. The first time I made this for my foodie friends, they literally stopped mid-conversation to ask what kind of wizardry was happening in the pan. That sizzle when the pasta hits the rendered fat? Absolute perfection. Let me walk you through every single step — by the end, you'll wonder how you ever made it any other way.
What Makes This Version Stand Out
Smoky Foundation: We render the bacon first and use every drop of that liquid gold to build our sauce, infusing every bite with deep, smoky flavor that powdered "bacon flavoring" could never achieve. This isn't just about adding bacon — it's about making bacon the hero that carries all the other flavors.
Texture Paradise: Most pasta dishes are one-note mushy, but not this one. We're talking about tortellini with crispy, caramelized edges that give way to tender pasta, interspersed with bacon bits that shatter like candy, all wrapped in a sauce that coats each piece like velvet without being heavy or gloopy.
Weeknight Friendly: Despite tasting like you spent hours in the kitchen, this whole dish comes together in under 45 minutes with ingredients you can find at any grocery store. If you've ever struggled with getting dinner on the table fast without sacrificing flavor, you're not alone — and I've got the fix.
Family Crowd-Pleaser: This is the dish that converts picky eaters and impresses food snobs simultaneously. I've served it to toddlers who hate vegetables, teenagers who live on takeout, and grandparents who swear they don't like "fusion" food — every single one asked for the recipe.
Cheeseburger Authenticity: We use a secret combination of cheeses and seasonings that nails that authentic cheeseburger taste, including a touch of pickle juice that brightens everything and makes you swear you're biting into a gourmet burger.
Make-Ahead Magic: The flavors actually improve overnight, making this perfect for meal prep or entertaining. Picture yourself pulling this out of the oven the next day, the whole kitchen smelling incredible while your guests think you slaved away all morning.
Inside the Ingredient List
The Flavor Base
Let's start with the bacon because, honestly, everything else is just supporting cast. You want thick-cut bacon here — none of that paper-thin stuff that disappears into nothingness. Thick-cut gives you those substantial, meaty bites that stand up to the tortellini and provide that crucial textural contrast. When you're at the store, look for bacon with good marbling; the fat is where all the flavor lives, and you'll be rendering it down to build your sauce foundation. I've tried this with turkey bacon in a moment of health consciousness, and while it was edible, it was like watching a movie on your phone instead of in a theater — technically the same story, but missing all the drama and impact.
The ground beef needs to be 80/20 lean-to-fat ratio — lean enough that your sauce doesn't become a greasy mess, but fatty enough that it still tastes like a proper burger. Grass-fed beef brings a deeper, more complex flavor that plays beautifully with the smoky bacon, but regular grocery store beef works perfectly fine. The key is breaking it up properly so you get those perfect little beefy bits that nestle into the tortellini like they were made for each other. And here's what happens if you skip the proper browning: instead of developing those gorgeous fond bits on the bottom of your pan, you'll end up with gray, boiled beef floating in a sad, watery sauce that tastes like cafeteria food.
The Texture Crew
Cheese tortellini is non-negotiable here — the plain stuff just doesn't have enough personality to stand up to all these bold flavors. Fresh tortellini from the refrigerated section will give you the most tender, delicate texture, but the dried stuff works in a pinch and actually holds up better if you're planning leftovers. The key is cooking it just shy of al dente since it'll finish cooking in the sauce. I've made this with everything from tiny tortellini to the jumbo ones, and while size doesn't affect the flavor, those medium-sized ones give you the perfect pasta-to-filling ratio in every bite.
Onions form the aromatic backbone of this dish, and I use a combination of yellow onion for sweetness and shallot for depth. Dice them small — nobody wants to bite into a big chunk of onion when they're expecting the harmony of burger flavors. The onions should practically melt into the sauce, providing that subtle sweetness that balances the saltiness of the bacon and cheese. When you add them to the rendered bacon fat, they'll pick up all those gorgeous brown bits from the bottom of the pan, creating layers of flavor that would make a French chef weep with joy.
The Unexpected Star
Here's where things get interesting — we're using cream cheese as our sauce base, but not in the way you think. Instead of just melting it in and hoping for the best, we blend it with sharp cheddar and a touch of American cheese for that authentic cheeseburger melt quality. The cream cheese provides body and tang, the sharp cheddar brings complexity, and the American cheese gives you that perfect, gooey melt that stretches like pizza cheese. If you skip the American cheese because you think you're too sophisticated for it, your sauce will taste perfectly fine but miss that nostalgic, diner-style cheeseburger quality that makes this dish so crave-worthy.
Pickle juice is my secret weapon here — just a tablespoon brightens everything up and adds that authentic burger joint flavor. Don't skip it, and don't substitute with vinegar; pickle juice has this perfect balance of acid, salt, and subtle herb flavors that vinegar alone can't replicate. I use the juice from Clausen dill pickles because they're refrigerated and have that fresh, crisp flavor, but any good quality pickle juice works. This tiny addition is what makes people taste it and say, "I can't put my finger on it, but this tastes exactly like a bacon cheeseburger."
The Final Flourish
Smoked paprika might seem like overkill when you already have bacon, but it adds a different kind of smokiness — more barbecue than breakfast, more complex than just salty pork. A little goes a long way; too much and your dish starts tasting like liquid smoke, but just the right amount and you've got this background note that makes people ask if you used a smoker. Garlic powder instead of fresh garlic keeps the flavor profile in burger territory rather than Italian territory — it's a subtle but important distinction that keeps this dish grounded in its cheeseburger heritage.
Finally, a handful of fresh cherry tomatoes added at the end provides those bursts of freshness that cut through all the richness. They should be added at the very last minute so they stay plump and juicy, creating little pockets of brightness in every bite. If you can't find good cherry tomatoes, you can skip them, but they add that fresh tomato quality that every great burger needs.
Everything's prepped? Good. Let's get into the real action...
The Method — Step by Step
- Start by laying your bacon strips in a cold, heavy-bottomed pan — starting cold helps render the fat properly without burning the meat. Turn the heat to medium and let it go low and slow, resisting the urge to crank up the heat for faster results. You'll hear the sizzle start softly, then build to a happy, steady rhythm as the fat begins to melt. This is where patience pays off; properly rendered bacon should take about 12-15 minutes, giving you time to prep everything else. The goal is golden-brown, crispy bacon that shatters when you bite it, not rubbery strips that taste like regret.
- While the bacon works its magic, bring a large pot of salted water to boil for your tortellini — and I mean properly salted, like seawater salty. This is your only chance to season the pasta itself, and under-seasoned pasta will drag down the whole dish no matter how good your sauce is. Cook the tortellini for 2 minutes less than package directions; they'll finish cooking in the sauce and absorb all those incredible flavors. Drain them but don't rinse — that starch on the outside helps the sauce cling better. I'll be honest — I ate half the batch before anyone else got to try it during my first attempt, standing over the sink, burning my tongue on hot pasta because I couldn't wait.
- Once your bacon reaches crispy perfection, remove it to a paper towel-lined plate but keep every precious drop of that rendered fat in the pan. This liquid gold is about to become the flavor foundation for everything else. Add your diced onions to the hot fat and watch them sizzle and dance, picking up all those gorgeous brown bits from the bottom of the pan. Stir occasionally, letting them develop some color — you're looking for translucent with golden edges, not caramelized to death. The smell at this stage is so intoxicating that my dog once sat by the stove for twenty minutes, hoping something would drop.
- Now for the beef — crank the heat to medium-high and add your ground beef, breaking it up with a wooden spoon into bite-sized pieces. Let it sit undisturbed for a minute or two to develop that gorgeous brown crust before you start stirring. You're looking for well-browned beef with crispy edges, not gray, steamed meat that tastes like sadness. Season it now with salt, pepper, and that crucial smoked paprika, letting the spices toast in the fat for about 30 seconds until they become fragrant. This is the moment of truth — properly browned beef will give your sauce incredible depth, while rushed, gray beef will make everything taste flat and boring.
- Here's where the magic happens — reduce the heat to medium and add your cream cheese in chunks, stirring constantly as it melts into the beef mixture. Don't panic when it looks like a broken, curdled mess at first — keep stirring and it'll smooth out into silky perfection. Once the cream cheese is incorporated, add your shredded cheddar and that slice of American cheese, stirring until you get this gorgeous, glossy sauce that coats the back of a spoon. Add a splash of pasta water — just a quarter cup — to loosen everything up and help the sauce come together. The transformation from lumpy disaster to smooth, velvety sauce happens in about two minutes, but don't walk away from the stove here or you'll end up with a broken, oily mess.
- Add your drained tortellini to the sauce and fold gently — you want to coat every pasta pillow without breaking them into sad, exploded bits. The pasta will finish cooking in the sauce, absorbing all those incredible flavors while releasing just enough starch to thicken everything to the perfect consistency. Now's the time for that pickle juice — stir it in and watch how it brightens everything up, cutting through the richness like a squeeze of lemon on seafood. Crumble in half your crispy bacon, saving the rest for the top so you get those textural pops in every bite. Taste and adjust seasoning — you might need more salt, a crack of black pepper, or if you're feeling adventurous, a dash of hot sauce.
- Remove from heat and let it rest for exactly five minutes — I know, I know, you're starving and it smells incredible, but this rest is crucial. During this time, the sauce will thicken slightly and the flavors will meld together in a way that makes the difference between good pasta and life-changing pasta. While you're waiting, chop your cherry tomatoes in half and crumble the remaining bacon. After the rest, fold in most of your tomatoes, saving a few for garnish on top. Serve immediately in warmed bowls — this is not a dish that improves with waiting, and the sauce will continue to thicken as it cools.
- The final flourish is simple but essential — a sprinkle of fresh parsley for color and freshness, your reserved bacon bits for crunch, and those glistening tomato halves on top. Don't skip the garnish — we eat with our eyes first, and those pops of green and red make this dish look as incredible as it tastes. Serve with extra black pepper on the side for those who like it bold, and maybe some hot sauce for the heat seekers. And now the fun part — dig in and prepare to be transported to burger heaven, no bun required.
That's it — you did it. But hold on, I've got a few more tricks that'll take this to another level...
Insider Tricks for Flawless Results
The Temperature Rule Nobody Follows
Here's the thing that separates good home cooks from great ones — temperature control. Your pan should be hot enough to sizzle when you add ingredients but not so hot that everything burns before it cooks through. I keep a laser thermometer in my kitchen (yes, I'm that person), and for this dish, you want your pan around 350°F when you add the onions. Too cool and they'll sweat out their water and become mushy; too hot and they'll burn before they sweeten. A friend tried skipping this step once — let's just say it didn't end well, and her kitchen still smells like burnt onions when she makes pasta. The cream cheese incorporation is another temperature-sensitive moment — if your pan is too hot, it'll seize up and become grainy faster than you can say "takeout."
Why Your Nose Knows Best
Trust your sense of smell more than your eyes when cooking this dish. When the onions are perfectly translucent with golden edges, they'll smell sweet and slightly caramelized, not sharp and sulfurous. The beef is properly browned when you get that rich, meaty aroma that makes your mouth water — if it still smells like raw meat, let it cook longer. Your nose will tell you when the garlic is perfectly toasted (fragrant but not bitter) and when your sauce is properly seasoned (it should smell balanced and tempting, not overly salty or flat). I once had a cooking instructor who said, "If it smells right, it'll taste right," and I've found this to be true about 99% of the time.
The 5-Minute Rest That Changes Everything
I cannot stress this enough — that five-minute rest after cooking is not optional, it's transformative. During this time, the sauce thickens to the perfect consistency, the pasta absorbs just enough flavor without becoming mushy, and the temperature drops to that magical "hot but won't burn your tongue" level that lets you actually taste all the nuances. Use this time to set the table, pour yourself a glass of wine, or just bask in the glory of what you've created. The sauce will continue to thicken as it cools, so if you wait too long, you'll need to loosen it with a splash of milk or cream. But serve it too soon, and you'll have a runny sauce that slides off the pasta like water off a duck's back.
Creative Twists and Variations
This recipe is a playground. Here are some of my favorite ways to switch things up:
The Spicy Southwest Version
Swap the smoked paprika for chipotle powder and add a diced jalapeño with the onions. Use pepper jack cheese instead of cheddar, and finish with fresh cilantro and a squeeze of lime. The combination of smoky chipotle, spicy jalapeño, and melty pepper jack creates this incredible Southwestern vibe that pairs perfectly with an ice-cold beer. I like to serve this version with crushed tortilla chips on top for extra crunch — it's like nachos and pasta had a delicious baby.
The Mushroom Lover's Dream
Add a pound of mixed mushrooms (cremini, shiitake, and oyster) sautéed in butter with the beef. The mushrooms add this incredible umami depth that makes the dish taste like it simmered for hours. Use fontina cheese instead of cheddar for a nuttier, more complex flavor that plays beautifully with the earthiness of the mushrooms. This version is so rich and satisfying that even dedicated carnivores won't miss the extra meat.
The Breakfast for Dinner Edition
Add a fried egg on top of each serving, letting the runny yolk create an extra-rich sauce when broken. Use breakfast sausage instead of ground beef, and add a handful of hash browns that get crispy in the bacon fat. Finish with everything bagel seasoning instead of parsley — it sounds crazy, but the combination of breakfast flavors with pasta is absolutely addictive. My kids request this version at least once a week, and honestly, I'm not complaining.
The Fancy Date Night Version
Use pancetta instead of bacon, ground veal instead of beef, and add a splash of white wine with the onions. Finish with fresh truffle shavings (or good truffle oil) and use a mix of fontina and Gruyère for the sauce. Serve it with champagne and prepare to be proposed to — this version is that good. The pancetta gives you a more delicate, sophisticated flavor while the veal keeps things incredibly tender and luxurious.
The Health-Conscious But Still Delicious Version
Use turkey bacon (I know, I know, but hear me out) and ground turkey breast. The trick is to add a tablespoon of olive oil to make up for the lack of bacon fat, and use Greek cream cheese for extra protein. Load it up with spinach and cherry tomatoes, and use whole wheat tortellini. Is it exactly the same as the original? No. But it's still incredibly satisfying and lets you enjoy the flavors without the food coma afterward.
The Loaded Baked Potato Style
Add diced, par-boiled potatoes that get crispy in the bacon fat, use sour cream instead of some of the cream cheese, and load it up with green onions and extra cheddar. Top with a dollop of sour cream and more bacon bits. This version is pure comfort food heaven — all the flavors of a loaded baked potato wrapped around tender tortellini. It's completely over the top and absolutely worth every calorie.
Storing and Bringing It Back to Life
Fridge Storage
This dish keeps beautifully in the fridge for up to four days, but here's the key — let it cool completely before storing. Hot pasta in a sealed container creates condensation that makes everything soggy and sad. Store it in shallow containers so it cools quickly, and press plastic wrap directly onto the surface to prevent that dreaded skin from forming. The sauce will thicken considerably as it cools, so don't panic when you see it the next day — we'll fix that during reheating.
Freezer Friendly
You can freeze this dish, but with a caveat — the texture won't be quite the same when thawed. If you must freeze it, undercook the tortellini by three minutes so it doesn't turn to mush when reheated. Freeze in individual portions for easy weeknight dinners, and use within two months for best quality. Thaw overnight in the fridge, not on the counter, and prepare to add a splash of milk or cream during reheating to bring the sauce back to life.
Best Reheating Method
The microwave works in a pinch, but the stovetop is where it's at for restoring this dish to its former glory. Add a splash of milk or cream to the pan, then add your pasta and heat gently over medium-low heat, stirring frequently. The goal is to warm it through without breaking the sauce or turning the tortellini to mush. If it seems dry, add more liquid a tablespoon at a time — you can always add more, but you can't take it away. Add a fresh sprinkle of cheese on top right before serving to restore that just-made quality that makes leftovers feel like a treat instead of a punishment.