I’ll be honest — the first time I tried to make a vegan caramel, I ended up with a sticky mess that clung to the pan like a bad breakup. The kitchen was filled with the smell of burnt sugar, my roommate walked in, and I swear I heard the oven sigh in disappointment. That disaster sparked a daring challenge: create a caramel that’s sweet, chewy, and entirely guilt‑free, without a single dairy drop. After countless trial runs, taste tests (yes, I ate half the batch before anyone else got to try it), and a few kitchen mishaps, I finally nailed the perfect date‑based caramel that could convert even the most skeptical sweet tooth.
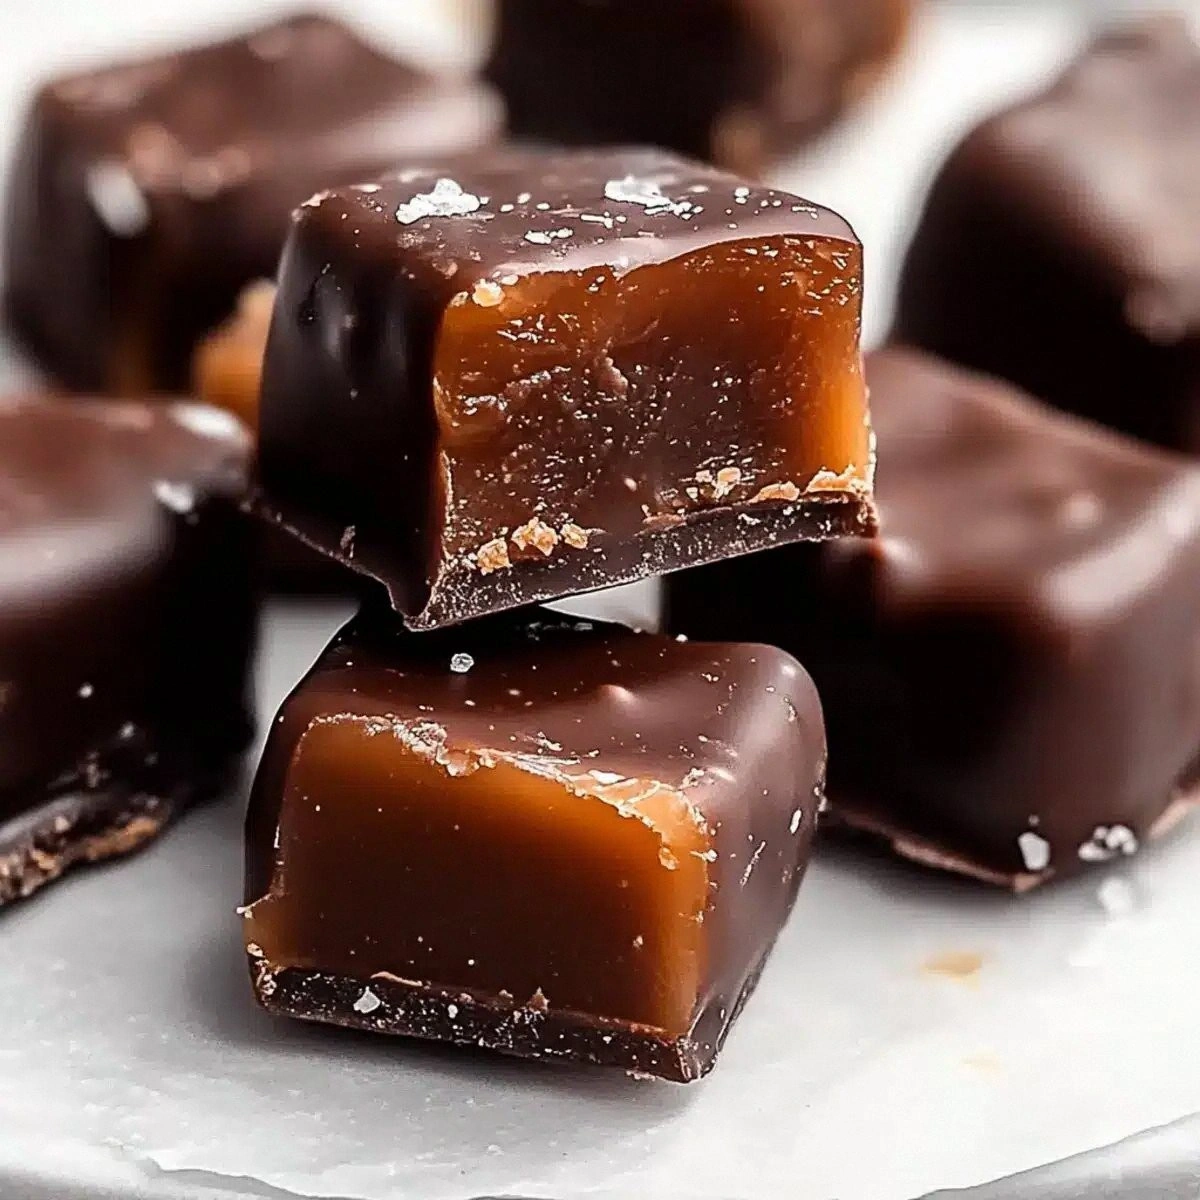
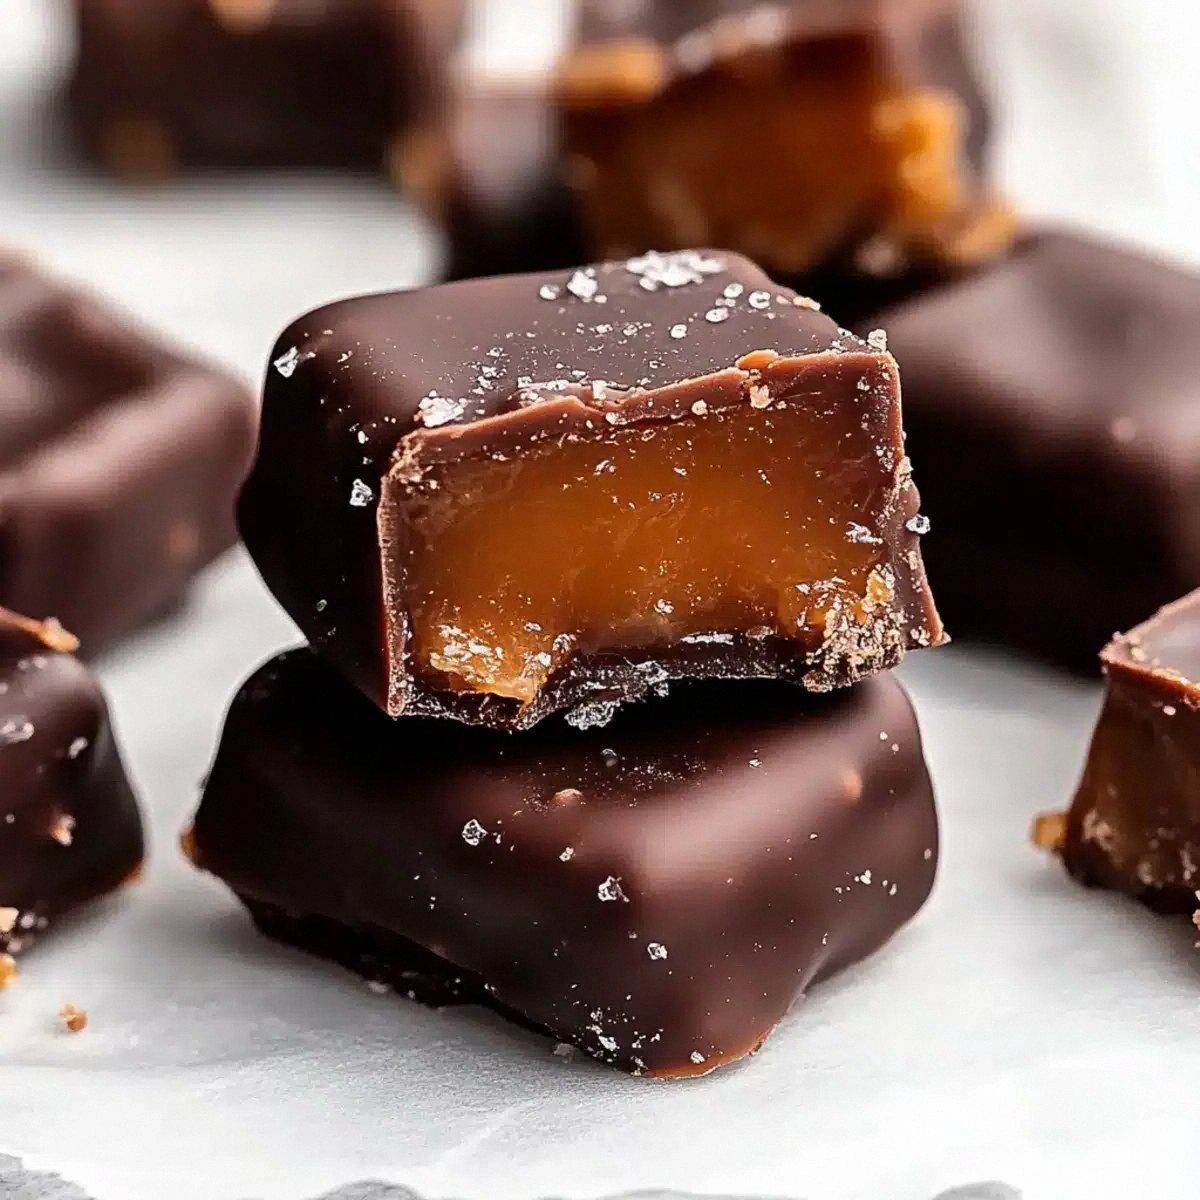
Picture this: a tray of glossy, amber‑colored squares that pull apart with a soft, buttery snap, the aroma of toasted dates mingling with a whisper of coconut, and a glossy chocolate coating that catches the light like a tiny mirror. The moment you bite, you’re greeted by a chew that’s as satisfying as a fresh‑baked cookie, yet the sweetness is nuanced, with caramel notes that linger just long enough to make you sigh. The texture is a delicate balance between firm and melt‑in‑your‑mouth, and the flavor profile is deep enough to feel indulgent but light enough to keep you from reaching for a glass of water after two bites.
What makes this version stand out? Most recipes try to mimic traditional caramel with coconut milk or vegan butter, ending up either too runny or overly oily. I discovered that the natural sugars and binding power of Medjool dates create a caramel base that’s naturally creamy, while almond butter adds a subtle nutty depth without the heaviness of dairy. The secret weapon? A double dose of coconut oil—one tablespoon to melt the dates into a silky paste, and a final two teaspoons to give the finished caramels that perfect glossy sheen.
I dare you to taste this and not go back for seconds. The combination of sweet dates, nutty almond butter, and that velvety chocolate coating is hands down the best version you’ll ever make at home. Okay, ready for the game‑changer? The technique of “dry‑roasting” the dates before blending them is the hidden gem that turns a simple mixture into a caramel that feels like it was crafted in a boutique confectionery. Let me walk you through every single step — by the end, you’ll wonder how you ever made it any other way.
What Makes This Version Stand Out
- Flavor Depth: The natural caramel notes of Medjool dates are amplified by a quick toast, giving you a richer, more complex sweetness than any refined sugar could achieve.
- Chewy Texture: Almond butter acts as a perfect binder, creating that coveted chew without the need for gelatin or other animal‑derived thickeners.
- Vegan Clean‑Label: No hidden dairy, no refined sugars, just whole‑food ingredients you can pronounce.
- Simple Prep: Only five ingredients, a food processor, and a pan—no fancy equipment or long‑hour simmering required.
- Show‑Stopping Shine: The final splash of coconut oil before the chocolate dip gives each caramel a glossy finish that looks professional.
- Make‑Ahead Magic: These caramels keep their texture and flavor for up to two weeks in the fridge, making them perfect for grab‑and‑go snacks.
- Crowd‑Pleaser: Even the most skeptical carnivore will admit these are “the best vegan candy” they’ve ever tasted.
- Healthier Sweet Spot: Packed with fiber from dates and healthy fats from almond butter and coconut oil, they’re a smarter indulgence.
Inside the Ingredient List
The Flavor Base
Medjool dates are the heart of this recipe. Their deep, honey‑like sweetness provides the caramel backbone, while their natural pectin gives the mixture that perfect chew. If you skip them, you’ll end up with a bland, crumbly mess that lacks cohesion. For the best results, choose plump, sticky dates that are still a little firm to the touch; they’ll blend smoother and retain that luscious chew.
If you’re allergic to dates or simply don’t have them on hand, you can substitute with figs, but expect a slightly fruitier flavor and a softer texture. Keep in mind that figs contain more water, so you may need to add a touch more almond butter to achieve the same firmness.
The Texture Crew
Almond butter brings a subtle nutty richness and a creamy mouthfeel that mimics the silkiness of dairy butter. It also adds a dose of healthy monounsaturated fats, making these caramels more satiating. Skipping almond butter will make the caramel too sticky and likely cause it to crack when you try to bite into it.
If you have a nut allergy, try sunflower seed butter; it has a comparable texture and a mild flavor that won’t overpower the dates.
The Unexpected Star
Coconut oil appears twice for a reason. The first tablespoon is blended with the dates to create a smooth, glossy base, while the final two teaspoons are drizzled over the formed caramels just before the chocolate dip. This two‑stage approach ensures a glossy finish without a greasy aftertaste. Using too much oil will make the caramels slipy, while too little will leave them dry and crumbly.
If you’re not a fan of coconut flavor, opt for a neutral‑taste refined avocado oil for the second addition; the shine will remain, but the coconut notes will be muted.
The Final Flourish
Chocolate chips are the crowning glory. They provide a contrasting snap and a luxurious bitterness that balances the sweet dates. Use high‑quality dark chocolate (70% cacao or higher) for the best flavor; milk chocolate will melt too quickly and become grainy.
A fun twist is to use white chocolate for a sweeter, creamier coating, but remember that white chocolate lacks the stabilizing cocoa butter, so it may set a bit softer.
Everything's prepped? Good. Let's get into the real action…
The Method — Step by Step
Start by preheating a dry skillet over medium‑low heat. Toss the pitted Medjool dates into the pan and let them toast for about 3‑4 minutes, stirring occasionally. You’ll hear a faint sizzle— that’s the sugar caramelizing. The dates should turn a deeper amber and release a fragrant, almost smoky aroma. Watch the color closely because if they darken too quickly, they’ll taste bitter.
Watch Out: Do not let the dates burn; a burnt note ruins the entire caramel profile.Transfer the toasted dates to a food processor. Add the tablespoon of coconut oil and blend until you achieve a smooth, glossy paste. This is the moment of truth— the mixture should look like thick honey, not a chunky mash. Scrape down the sides with a spatula to ensure every piece is incorporated. If the blend feels too dry, drizzle in an extra teaspoon of coconut oil; if it’s too runny, add a handful more dates.
Next, add the almond butter and the remaining tablespoon of coconut oil to the processor. Blend again until the mixture is uniform and glossy. You’ll notice the texture becoming silkier, almost like a thick frosting. This step is where the chewiness is locked in, thanks to the healthy fats binding the natural sugars.
Kitchen Hack: Run the mixture through a fine mesh sieve after blending; it removes any stray fiber bits, giving you a velvety caramel that melts on the tongue.Line a baking sheet with parchment paper. With a lightly oiled spoon or a small ice‑cream scoop, portion out the caramel mixture into 1‑inch rounds. Press each round gently with the back of a spoon to flatten them to about ½‑inch thickness. The edges should be slightly raised, which helps the chocolate coating cling later. Feel the texture— it should be firm enough to hold its shape but still pliable.
Place the parchment‑lined tray in the freezer for 15‑20 minutes. This quick chill firms the caramels, making them easier to handle when you dip them in chocolate. While they’re chilling, melt the chocolate chips in a double boiler or microwave in 20‑second bursts, stirring in between. The chocolate should be smooth, glossy, and just warm enough to coat without seizing.
Remove the caramels from the freezer. Using a fork or a small spatula, dip each caramel into the melted chocolate, allowing any excess to drip back into the bowl. The chocolate should envelop the caramel like a silky blanket, creating a crisp outer shell once it sets. Immediately sprinkle the final two teaspoons of coconut oil over the dipped caramels; it will give them that professional‑grade shine.
Transfer the chocolate‑coated caramels back onto the parchment sheet. Let them set at room temperature for about 10 minutes, then move the tray to the refrigerator for an additional 20 minutes to ensure the chocolate fully hardens. You’ll hear a faint “snap” when you break one—that’s the sound of success.
Finally, store the caramels in an airtight container. They’ll stay soft and chewy in the fridge for up to two weeks, or you can freeze them for up to three months. When you’re ready to serve, let them sit at room temperature for 5‑10 minutes; the flavors will open up, and the chocolate will regain its glossy luster.
That's it — you did it. But hold on, I've got a few more tricks that'll take this to another level…
Insider Tricks for Flawless Results
The Temperature Rule Nobody Follows
Never melt chocolate above 115°F (46°C). Exceeding this temperature causes the cocoa butter to separate, resulting in a dull, grainy coating. Keep a candy thermometer handy, and if you’re using a microwave, stir every 20 seconds to keep the heat even. I once melted chocolate in a pot that was too hot and ended up with a matte finish that never set properly— a lesson learned the hard way.
Why Your Nose Knows Best
When the dates are toasting, trust the scent. A sweet, caramel‑like aroma means they’re perfectly browned; a burnt, acrid smell signals it’s time to pull them off the heat. Your nose is a more reliable gauge than a timer because stove outputs can vary wildly.
The 5‑Minute Rest That Changes Everything
After blending the date‑almond mixture, let it rest for five minutes before shaping. This short pause allows the fats to re‑emulsify, giving the caramels a firmer bite. Skipping this step often results in a softer, less cohesive candy that can fall apart when you try to dip it.
The Double‑Oil Shine Secret
Adding a splash of coconut oil right before the chocolate dip creates a glossy finish that looks like it was brushed with a professional glaze. It also helps the chocolate set faster, reducing the time the caramels spend at room temperature where they could get sticky.
The Freeze‑Then‑Dip Method
Chilling the caramels before dipping makes them less likely to melt the chocolate upon contact. I once tried to dip warm caramels and ended up with a chocolate shell that sagged and dripped. A quick 15‑minute freeze gives you a firm surface that instantly solidifies the chocolate, creating a clean, crisp edge.
The “Snap” Test
When the chocolate has set, gently tap a caramel with a fingertip. If it produces a clean snap, the chocolate shell is fully set and the interior is firm enough to hold together. If it bends or feels rubbery, give it a few more minutes in the fridge. This tactile test saves you from serving a sloppy, gummy candy.
Creative Twists and Variations
This recipe is a playground. Here are some of my favorite ways to switch things up:
Spicy Chili Chocolate
Add a pinch of cayenne pepper to the chocolate melt for a subtle heat that contrasts the sweet dates. The spice awakens the palate and makes the caramel feel more sophisticated— perfect for an adult gathering.
Sea‑Salt Caramel Crunch
Before the final chocolate dip, sprinkle a tiny pinch of flaky sea salt on each caramel. The salt accentuates the sweetness and adds a delightful crunch that pops with each bite.
Nutty Delight
Fold in finely chopped toasted pistachios or hazelnuts into the date‑almond mixture before shaping. The nuts add texture and a buttery flavor that pairs beautifully with the chocolate coating.
Citrus Zest Infusion
Stir in a teaspoon of orange or lemon zest into the caramel base. The bright citrus notes cut through the richness, giving the caramels a fresh, summery vibe.
White Chocolate Coconut
Swap dark chocolate chips for white chocolate and sprinkle toasted coconut flakes on top before the chocolate sets. This variation leans into the coconut theme, creating a tropical treat that’s perfect for beach picnics.
Matcha Green Tea
Add a teaspoon of high‑quality matcha powder to the chocolate melt for an earthy, slightly bitter contrast. The vibrant green hue also makes these caramels look Instagram‑ready.
Storing and Bringing It Back to Life
Fridge Storage
Place the caramels in an airtight container lined with parchment paper to prevent them from sticking together. They stay fresh, chewy, and perfectly set for up to 14 days. For extra protection, add a thin sheet of wax paper between layers.
Freezer Friendly
If you’ve made a big batch, freeze the caramels in a single layer on a tray, then transfer them to a zip‑top freezer bag. They’ll keep for up to three months. When you’re ready to enjoy them, let them thaw in the fridge for an hour, then bring to room temperature for the best texture.
Best Reheating Method
To revive a slightly hardened caramel, place it on a microwave‑safe plate, sprinkle a tiny splash of water (about a teaspoon for a batch), and microwave for 10‑15 seconds. The steam re‑hydrates the interior, restoring that melt‑in‑your‑mouth chew without melting the chocolate shell.