Ever find yourself standing in front of a pot of empty pantry, feeling the weight of a craving that refuses to quit? That night, my kitchen was a battlefield of flour dust, a single egg, and the faint scent of vanilla that slipped through the air like a secret invitation. I was staring at a battered pan, the kind that always seemed to promise more than it delivered. The idea hit me: funnel cake, but bite‑sized, crisp, and irresistibly sweet—no circus tent required.
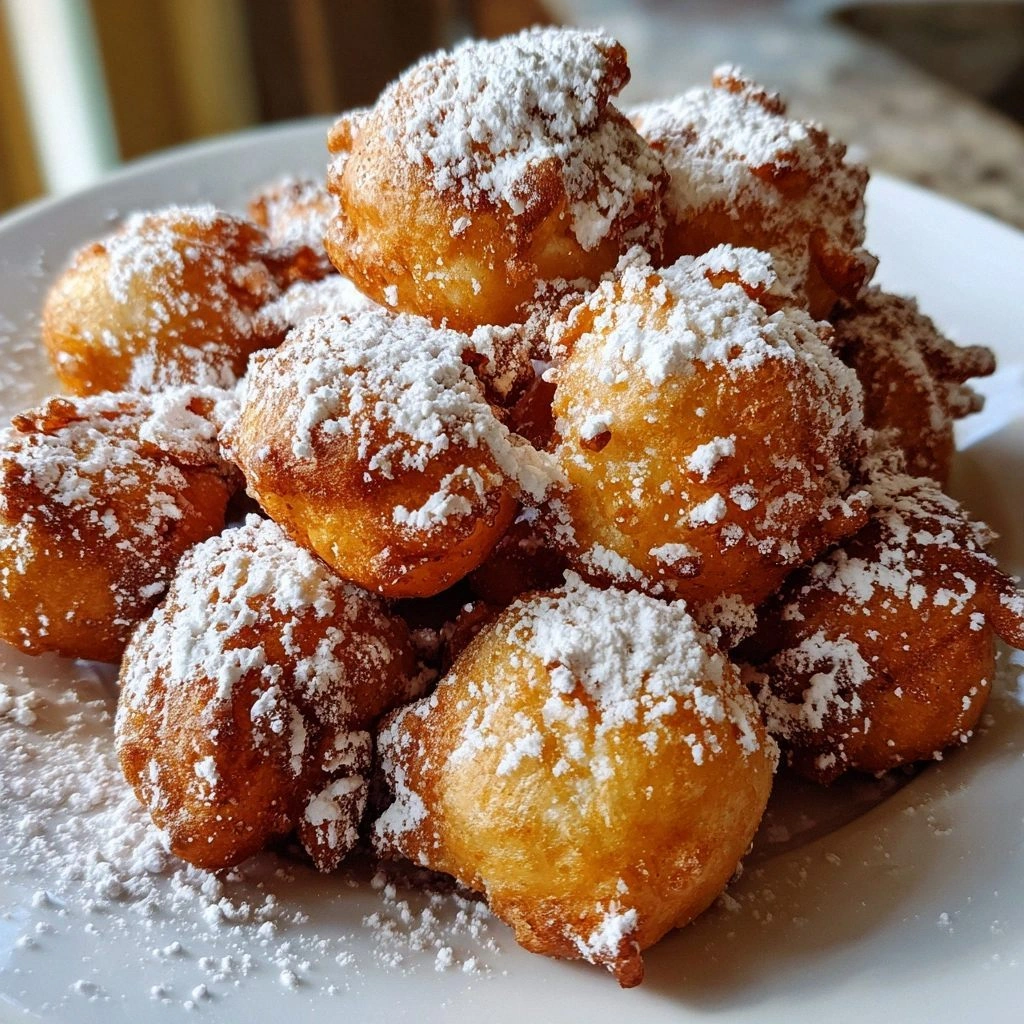
I scooped the batter into a squeeze bottle, the sugary mixture glistening under the kitchen light. The sizzle as it hit the hot oil was like a drumroll before a grand finale. The aroma of caramelized sugar danced with the subtle warmth of vanilla, and the sound of popping bubbles echoed like applause. The first bite was a revelation—crisp edges that cracked like thin ice, a golden interior that melted in your mouth, and a dusting of powdered sugar that was the perfect counterpoint to the buttery batter. I swear I could taste the anticipation of a crowd, the clink of forks, and the hum of excitement that follows a good dessert.
What makes this version stand out is not just the flavor, but the entire experience. I’ve taken a classic carnival treat and turned it into a handheld, bite‑sized wonder that can be shared at any gathering. The batter is light enough to keep the texture airy, yet rich enough to satisfy sweet cravings. The technique I’ll reveal—using a squeeze bottle for precise shape control—ensures each bite is perfectly formed. The result is a dessert that feels indulgent but is surprisingly easy to prepare, even for the most novice cook. And if you think this is just another recipe, think again. I dare you to taste this and not go back for seconds.
Let me walk you through every single step—by the end, you’ll wonder how you ever made funnel cake any other way. From the moment the batter hits the pan to the final dusting of powdered sugar, I’ll share my secrets, my mishaps, and the small tricks that elevate this simple treat into a showstopper.
What Makes This Version Stand Out
- Texture: The batter’s airy lift keeps the inside tender while the hot oil crisps the exterior to a golden perfection.
- Flavor: A subtle vanilla note balances the sweetness of the sugar, creating a harmonious bite that isn’t cloying.
- Portability: Bite‑sized portions mean you can serve it as a party favor, a snack on the go, or a quick dessert after dinner.
- Speed: From prep to plate, the entire process takes under 45 minutes—ideal for last‑minute celebrations.
- Versatility: The base batter is a canvas—add chocolate chips, cinnamon, or citrus zest to change the flavor profile.
- Visual Appeal: The bright, golden rings of batter against a dark, glossy oil create a striking contrast that’s Instagram‑ready.
- Make‑ahead Friendly: The batter can be pre‑mixed and refrigerated for up to 24 hours, making it a stress‑free option for busy days.
- Ingredient Quality: Using high‑quality flour and fresh eggs ensures the best rise and flavor.
Alright, let’s break down exactly what goes into this masterpiece…
Inside the Ingredient List
The Flavor Base
All‑Purpose Flour is the backbone of our batter. It provides structure and a neutral canvas that lets the other flavors shine. If you’re craving a gluten‑free version, swap it with a 1:1 blend of rice flour and potato starch, but keep the ratio the same to maintain the batter’s consistency.
Granulated Sugar is the star of the show, not only sweetening the batter but also aiding in that coveted caramelized crust. A pinch of sea salt can elevate the sweetness, bringing out the depth of flavor. If you prefer a darker, caramelized finish, try using brown sugar instead—just reduce the amount slightly to avoid an overly dense texture.
The Texture Crew
Baking Powder is the leavening agent that keeps our bites light and fluffy. Without it, the batter would sink and become dense. For a richer flavor, use double‑acting baking powder, which reacts in two phases—once when wet and again at high heat.
Salt is a flavor enhancer that balances the sweetness and brings out the vanilla’s warmth. A tiny pinch is enough; too much and you’ll taste the brine. If you’re using a salted flour blend, reduce the salt by half.
The Unexpected Star
Egg is the binder that gives the batter its cohesive structure and adds a subtle richness. A single large egg is perfect for four servings. If you’re vegan, replace the egg with a flaxseed “egg” (1 tablespoon ground flaxseed + 3 tablespoons water), though the texture will be slightly different.
Milk adds moisture and helps achieve a smooth, pourable batter. Whole milk gives the richest flavor, but low‑fat milk works just as well if you’re watching calories. A splash of almond milk adds a nutty undertone, but keep the volume consistent.
The Final Flourish
Vanilla Extract is the aromatic whisper that ties everything together. A teaspoon for four servings is enough to give the batter a warm, comforting scent. If you prefer a deeper flavor, use pure vanilla bean paste instead—just halve the amount to avoid overpowering the batter.
Vegetable Oil is the medium that turns our batter into golden rings. Choose a neutral oil with a high smoke point, such as canola or peanut oil. Using olive oil will give a distinct taste that might clash with the sweetness.
Powdered Sugar is the finishing touch that adds a dusting of sweetness and an eye‑catching sparkle. Lightly sprinkle it over the freshly fried bites while they’re still warm to ensure it adheres.
Everything's prepped? Good. Let's get into the real action…
The Method — Step by Step
- In a medium bowl, whisk together the flour, sugar, baking powder, and salt until fully blended. The dry mixture should look like fine sand. This step ensures there are no lumps that could ruin the batter’s smoothness. If you’re feeling adventurous, sprinkle in a pinch of cinnamon for a subtle spice note.
- In a separate bowl, beat the egg, then stir in the milk and vanilla extract until the mixture is homogenous. The liquid should be a silky sheen—no streaks. The egg not only binds but also gives the batter a slight sheen that will shine when fried.
- Combine the wet and dry ingredients, stirring gently until just incorporated. It’s okay if the batter remains slightly lumpy; over‑mixing will develop gluten and make the bites tough. Let the batter rest for 5 minutes; this allows the baking powder to activate fully.
- While the batter rests, heat the vegetable oil in a deep, heavy‑bottomed pot to 375°F (190°C). Use a thermometer for accuracy—this temperature is crucial for a crisp exterior without a greasy interior. If the oil is too cold, the bites will absorb oil and become soggy; if too hot, they’ll burn on the outside before cooking through.
- Pour the batter into a squeeze bottle fitted with a wide nozzle. Hold the bottle at a 45‑degree angle and squeeze a small amount of batter into the hot oil, creating a ring. Let it spread naturally; the batter should curl slightly at the edges. The trick? Keep the batter at a steady flow—too much at once and you’ll get a big, uneven blob.
- Fry each bite for 2–3 minutes on each side, or until the edges turn golden brown and the center is set. Flip carefully with a slotted spoon, ensuring the oil remains at the same temperature. If you notice the oil temperature dropping, add a little more oil to keep the heat steady.
- Transfer the fried rings to a paper towel‑lined plate to drain excess oil. The paper towels should be stacked to absorb the oil quickly; this keeps the bites crispy. While they’re still warm, dust them generously with powdered sugar, letting it cling like a fine snowfall.
- Serve immediately, or if you’re preparing ahead, place the bites on a wire rack to keep them from steaming. Pair them with fresh berries or a drizzle of chocolate sauce for an extra wow factor. And remember: the sizzle when it hits the pan? Absolute perfection.
That's it—you did it. But hold on, I've got a few more tricks that'll take this to another level…
Insider Tricks for Flawless Results
The Temperature Rule Nobody Follows
Maintaining an oil temperature of exactly 375°F is the secret to a perfectly crisp bite. Use a deep‑fry thermometer to monitor the heat. If the temperature drops, add a splash of oil; if it climbs, let it cool for a minute. A consistent temperature ensures even browning without sogginess.
Why Your Nose Knows Best
Smell the batter before you fry it. A slight caramel scent indicates the sugars have begun to caramelize in the pan, signaling the right moment to flip. If the batter smells raw, let it cook longer; if it smells burnt, lower the heat immediately.
The 5‑Minute Rest That Changes Everything
After the batter rests for 5 minutes, the gluten relaxes, and the baking powder fully activates. Skipping this step often results in chewy, dense bites. I once rushed this part and ended up with a batch that tasted like a pancake. Lesson learned: patience pays off.
The Squeeze Bottle Trick
Using a squeeze bottle with a wide nozzle gives you precise control over the batter’s thickness and shape. It also prevents the batter from splattering onto the pan, keeping your kitchen cleaner. If you don’t have a bottle, a small spoon will work, but you’ll have less control.
The Quick Dust
Dust the powdered sugar while the bites are still warm. The residual heat helps the sugar adhere, creating a crisp, sweet coating. If you wait too long, the sugar will slide off. A quick sprinkle is all you need.
Creative Twists and Variations
This recipe is a playground. Here are some of my favorite ways to switch things up:
Chocolate‑Infused Bites
Fold in 2 tablespoons of melted dark chocolate into the batter before frying. The chocolate melts into the bite, creating pockets of rich flavor that pair beautifully with a drizzle of chocolate sauce.
Citrus Zest Surprise
Add the zest of one orange or lemon to the batter. The bright citrus cuts through the sweetness, giving each bite a refreshing lift. Pair with a vanilla glaze for a balanced dessert.
Spiced Cinnamon Rings
Stir in 1 teaspoon of ground cinnamon and a pinch of nutmeg. The warm spices create a comforting flavor reminiscent of fall, perfect for a cozy evening.
Berry‑Burst Variation
Drop a handful of fresh blueberries or raspberries into each ring before frying. The berries burst into a sweet sauce, adding color and a fruity note that makes the bites pop.
Salted Caramel Twist
After dusting with powdered sugar, drizzle a light stream of salted caramel sauce over the bites. The salty caramel enhances the sweetness and adds a luxurious finish.
Gluten‑Free Edition
Replace the all‑purpose flour with a 1:1 blend of rice flour and potato starch. Keep the rest of the ingredients the same. The texture remains light, and the flavor is unchanged.
Storing and Bringing It Back to Life
Fridge Storage
Store fried bites in an airtight container at room temperature for up to 24 hours. If you need to keep them longer, refrigerate them for up to 48 hours. They’ll stay crisp for a day or two, especially if you place a paper towel between layers to absorb moisture.
Freezer Friendly
Freeze the fried bites in a single layer on a parchment paper sheet. Once frozen, transfer them to a freezer bag. They’ll stay good for up to 2 months. When ready to serve, reheat in a preheated oven at 350°F for 5 minutes.
Best Reheating Method
To revive a frozen batch, add a splash of water to the pot before reheating. The steam created will restore moisture without making the bites soggy. A quick 5‑minute bake at 350°F also works well for crispness.