The kitchen was a battlefield that night. I had just pulled a loaf of banana bread from the oven, only to discover that the center was a soggy, mushy mess that looked like it had been left in a puddle of batter. My friends stared, mouths open, as I tried to explain that I had forgotten to let the loaf cool before slicing. They laughed, but the next time I went to the grocery store, I was armed with a notebook, a ruler, and an unshakable determination to create a banana bread that would survive the test of time and temperature.
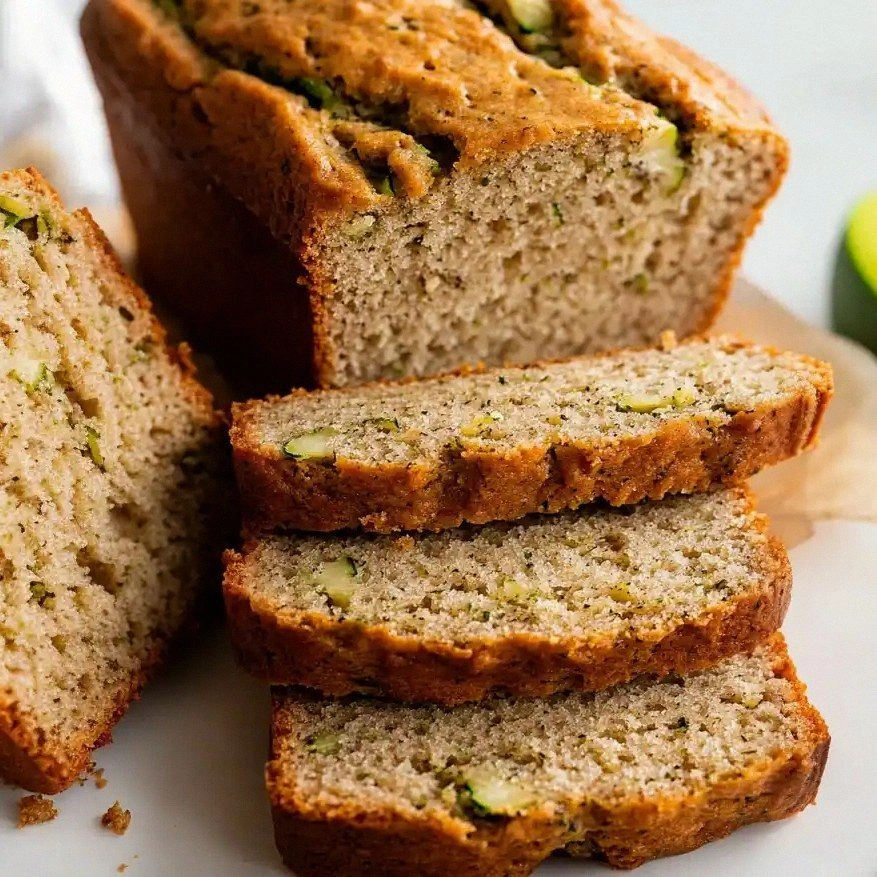
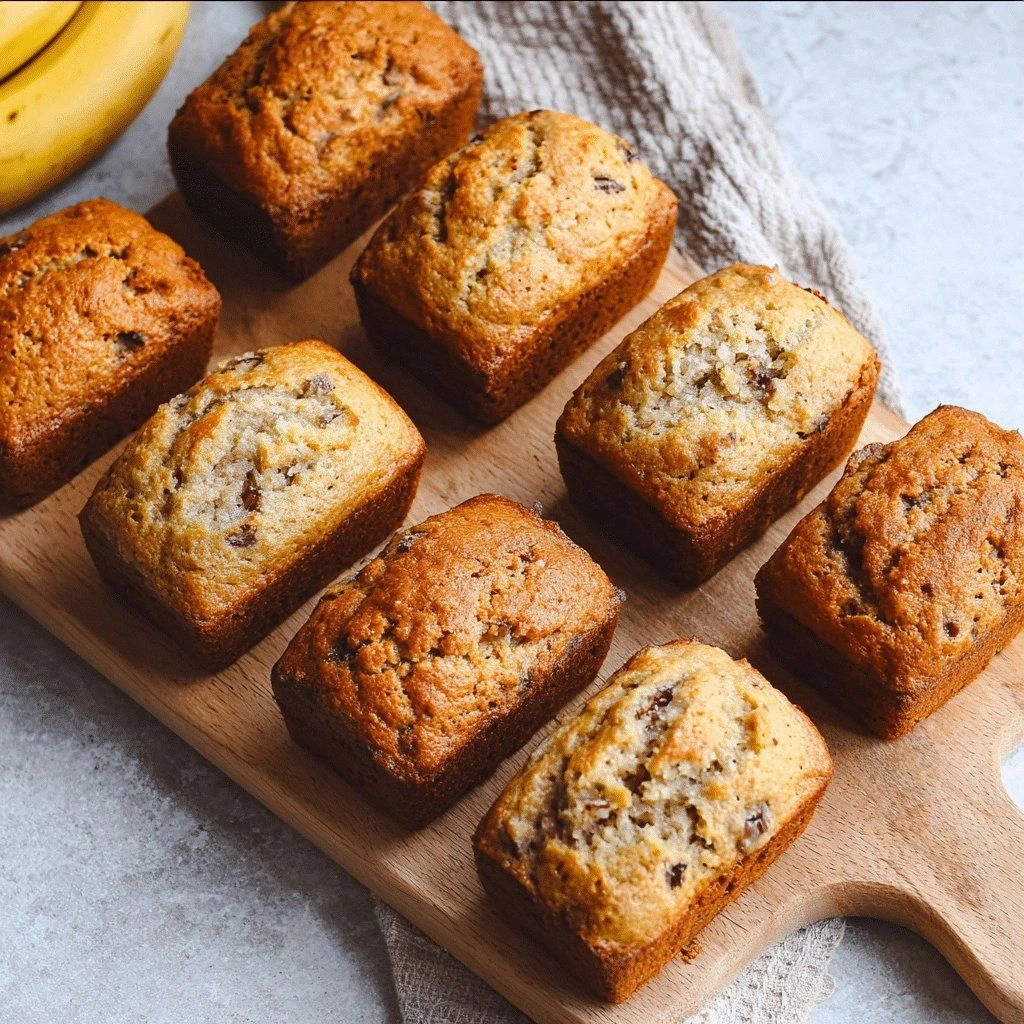
Picture this: the smell of ripe bananas mingling with the warm aroma of toasted sugar, the sound of the batter bubbling in the mixing bowl, the feel of the dough’s silky smoothness as you fold in the bananas, the taste of a perfectly balanced sweet and buttery crumb. I was looking for a loaf that didn’t crumble like a sandcastle when you cut it, but rather held together like a well‑structured, buttery puzzle. That’s why I broke the recipe into mini loaf cakes—each bite is a concentrated burst of flavor, each slice a perfect proportion of moistness and structure.
What sets this version apart? It’s the deliberate balance of wet and dry, the careful timing of when you fold in the bananas, the use of melted butter instead of softened butter for a richer crumb, and the subtle addition of vanilla and a splash of milk to keep the batter from drying out. It also uses a blend of brown and white sugar to give that caramelized edge, and a pinch of baking soda to lift the batter just enough to keep it airy. The result is a loaf that can be sliced into bite‑sized cakes that hold their shape, melt in your mouth, and leave you craving more. I dare you to taste this and not go back for seconds.
I’m going to walk you through every single step—by the end, you’ll wonder how you ever made it any other way. And trust me, you’ll want to keep this recipe on your calendar for every occasion where you need a quick, crowd‑pleasing dessert or a comforting breakfast treat. Let’s dive in.
What Makes This Version Stand Out
- Texture: The mini loaf cakes have a tender crumb that feels like a cloud, yet the edges are slightly crisp, creating a delightful contrast that satisfies both soft and crunchy cravings.
- Flavor: The combination of ripe bananas, brown sugar, and a splash of vanilla creates a deep, caramelized sweetness that isn’t overpowering but leaves a lingering finish.
- Simplicity: With only a handful of pantry staples, you can whip this up in 15 minutes of prep and 30 minutes of baking—no special equipment required.
- Uniqueness: The use of melted butter, rather than softened butter, gives the batter a glossy sheen and richer mouthfeel, while the addition of milk keeps it from drying out.
- Versatility: These mini loaves can be served for breakfast, dessert, or as a snack, and they freeze well for later enjoyment.
- Make‑ahead Potential: Bake a batch, cool completely, and store in an airtight container for up to a week. Reheat in the oven or microwave for a quick treat.
- Kid‑friendly: The recipe can be adapted with chocolate chips or nuts, making it a hit with kids who love a little extra indulgence.
- Health‑conscious tweaks: Swap all-purpose flour for whole wheat or oat flour, reduce sugar, or add a handful of flaxseed for extra fiber without compromising taste.
Alright, let’s break down exactly what goes into this masterpiece…
Inside the Ingredient List
The Flavor Base
At the heart of this loaf are the bananas. They provide natural sweetness, moisture, and a subtle earthy flavor that carries the other ingredients. When ripe, they break down into a buttery consistency that’s perfect for baking. If you’re using overripe bananas, the loaf will taste sweeter and the crumb will be denser, which is actually desirable for a more decadent treat.
Vanilla extract is the secret to a rounded flavor profile. A teaspoon is enough to lift the banana’s natural sweetness without overpowering it. If you’re vegan, a splash of almond or maple extract works wonderfully, offering a slightly different aroma but keeping the balance.
Salt is the unsung hero that brings out the flavors of every component. Even a half teaspoon can make the sweetness feel balanced and the banana flavor pop. Skipping it will leave the loaf tasting flat.
The Texture Crew
All-purpose flour gives the loaf its structure. Two cups is the sweet spot for mini loaf cakes—enough to hold the batter together but not so much that it becomes dry. If you prefer a gluten-free version, you can replace it with a 1:1 blend of rice flour and oat flour, but you’ll need to add a binding agent like xanthan gum.
Baking powder and baking soda work together to leaven the batter. Baking powder provides lift in the absence of acidic ingredients, while baking soda reacts with the natural acidity of bananas to create carbon dioxide bubbles that expand the crumb. Together, they give the loaf a light, airy feel.
Melted butter, as opposed to softened, adds richness and a glossy sheen to the batter. It also lowers the batter’s viscosity, allowing the bananas to disperse evenly. If you’re looking for a lower-fat version, you can replace half the butter with unsweetened applesauce, but the texture will be slightly less decadent.
The sugars—brown and white—play distinct roles. Brown sugar adds a caramel depth and moisture, while white sugar provides a clean sweetness that balances the banana’s natural tartness. Together, they create a complex sweetness that’s far more interesting than a single sugar type.
The Unexpected Star
Milk is the unsung hero that keeps the batter from drying out. A half cup of milk adds moisture without making the loaf soggy. If you’re dairy-free, oat or almond milk works well and won’t alter the flavor significantly.
Eggs bind everything together, providing structure and helping the loaf rise. A single large egg is enough for four mini loaves, but if you’re making a larger batch, add an extra egg per two batches.
The Final Flourish
Optional add-ins like walnuts or chocolate chips turn the loaf into a dessert that satisfies both nut lovers and chocolate addicts. Walnuts add a subtle crunch and a nutty undertone that pairs beautifully with banana. Chocolate chips create pockets of gooey sweetness that melt in your mouth.
If you’re looking to elevate the loaf further, sprinkle a pinch of sea salt on top before baking. It caramelizes slightly, giving a pleasant contrast to the sweet interior.
Everything’s prepped? Good. Let’s get into the real action…
The Method — Step by Step
- Preheat your oven to 350°F (175°C) and line a mini loaf pan (or a muffin tin for individual cakes) with parchment paper. This ensures easy removal and prevents sticking. The preheat time is critical; a hot oven guarantees a crisp edge while keeping the center moist.
- Dry Mix in a large bowl: sift 2 cups of all-purpose flour, 1 teaspoon of baking powder, 1/2 teaspoon of baking soda, and 1/2 teaspoon of salt. Sifting removes lumps and aerates the flour, which translates into a lighter crumb.
- Wet Mix in a separate bowl: combine 1 cup of mashed ripe bananas, 1 teaspoon of vanilla extract, 1/4 cup melted butter, 1/3 cup brown sugar, 1/4 cup white sugar, 1 large egg, and 1/2 cup milk. Beat until the mixture is silky and the sugars dissolve. This step is crucial—overmixing can toughen the loaf.
- Combine the wet and dry mixtures. Stir gently with a rubber spatula until just combined. The batter should be thick but pourable; if it’s too thick, add a tablespoon of milk to loosen it. The batter should have a smooth, glossy appearance.
- Add Extras (optional): fold in 1/2 cup chopped walnuts or 1/4 cup chocolate chips if desired. This step adds texture and flavor pockets.
- Fill the Pan evenly, leaving about a quarter inch of space at the top to allow for expansion. Gently tap the pan on the counter to release air bubbles that could cause uneven rise.
- Bake for 30 minutes, or until a toothpick inserted into the center comes out clean and the top is golden brown. The baking time is the trickiest part: too short, and the center will be raw; too long, and it will dry out. Keep an eye on the edges—they should pull away slightly from the pan, signaling readiness.
- Cool in the pan for 10 minutes, then transfer to a wire rack to cool completely. This step prevents condensation from forming on the bottom, which can make the loaf soggy.
- Serve as bite-sized cakes or slice into thick rounds. Pair with a dollop of whipped cream, a drizzle of caramel sauce, or a scoop of vanilla ice cream for an indulgent treat.
That’s it — you did it. But hold on, I’ve got a few more tricks that will take this to another level…
Insider Tricks for Flawless Results
The Temperature Rule Nobody Follows
Many bakers set the oven to 375°F, but that temperature can scorch the edges before the center finishes baking. 350°F is the sweet spot for banana bread: it allows the batter to rise evenly and develop a golden crust without drying out. If you’re using a convection oven, reduce the temperature by 25°F to avoid overcooking.
Why Your Nose Knows Best
The scent of banana bread rising in the oven is the most reliable indicator of doneness. When the aroma is sweet and slightly caramelized, the loaf is ready. If you’re uncertain, insert a toothpick; if it comes out clean, the loaf is done. A moist crumb should feel springy to the touch.
The 5-Minute Rest That Changes Everything
After removing the loaf from the oven, let it rest for five minutes before slicing. This brief pause allows the steam to redistribute, preventing the loaf from collapsing and ensuring each bite is moist and cohesive.
The Quick Chill Trick
If you’re making a large batch, place the cooled loaves on a sheet of parchment and freeze them for 30 minutes before transferring to an airtight container. This prevents them from sticking together and makes portioning easier later.
The Milk Boost
Adding a splash of milk to the batter keeps the crumb moist. If you find your loaf drying out, try adding an extra 2 tablespoons of milk next time. The extra liquid won’t affect the rise but will help maintain a tender crumb.
Creative Twists and Variations
This recipe is a playground. Here are some of my favorite ways to switch things up:
Nutty Banana Crunch
Swap the walnuts for chopped pecans or almonds. Add a teaspoon of cinnamon for a warm, spice‑y flavor. The nuts give a satisfying crunch that pairs well with the soft loaf.
Chocolate Banana Bliss
Fold in 1/2 cup of dark chocolate chips and replace the brown sugar with 1/4 cup of cocoa powder. The result is a chocolate‑banana loaf that feels like a brownie meets banana bread.
Citrus Burst
Add zest from one orange or lemon to the batter for a bright, fresh note. The citrus cuts through the sweetness and adds a subtle tang that elevates the overall flavor.
Spiced Apple Banana
Mix in 1/2 cup of diced apples and a pinch of nutmeg. The apples add moisture and a fruity sweetness that complements the banana. The nutmeg brings a warm spice that’s perfect for fall.
Vegan Delight
Replace the butter with coconut oil, the egg with a flaxseed “egg” (1 tablespoon ground flaxseed mixed with 3 tablespoons water), and the milk with almond milk. The loaf remains moist and flavorful, and the coconut oil adds a subtle tropical hint.
Coffee Infusion
Stir in a tablespoon of instant coffee powder or espresso into the batter. The coffee intensifies the banana flavor and adds a depth that’s reminiscent of a mocha loaf.
Storing and Bringing It Back to Life
Fridge Storage
Wrap the cooled loaf tightly in plastic wrap or store in an airtight container. It will keep for up to 5 days in the refrigerator. When ready to eat, let it sit at room temperature for 15 minutes before slicing to restore its softness.
Freezer Friendly
Slice the loaf into individual cakes, wrap each slice in parchment paper, and place them in a freezer bag. They’ll stay fresh for up to 3 months. Thaw at room temperature for 30 minutes before serving.
Best Reheating Method
Reheat a slice in the oven at 350°F for 5 minutes or microwave on medium power for 20 seconds. Add a tiny splash of water to the loaf before reheating; it steams back to perfection, preventing dryness.