I once walked into a kitchen that smelled like burnt toast and regret, because my roommate had attempted “liver and onions” and ended up with something that could have been used as a doorstop. The onions were charred beyond recognition, the liver was a rubbery slab that made my teeth ache, and the whole experience left a lingering dread of organ meat that I swore never to revisit. Then, on a rainy Thursday night, a friend dared me to make the “classic” version, claiming it was the ultimate comfort food for anyone who’d ever been embarrassed by a culinary flop. I accepted the challenge, armed with a sturdy cast‑iron skillet, a pinch of confidence, and a secret technique I’d been saving for a moment like this.
Picture the scene: the kitchen lights are warm, the skillet hisses like a contented cat, and the sweet, caramel‑brown perfume of onions begins to fill the air. The liver, after a quick dip in milk, looks pink and tender, ready to meet the pan. The sound of the onions hitting the oil is that satisfying sizzle that makes you feel like a maestro conducting a symphony of flavor. As the onions soften, they turn a glossy amber, releasing sugars that will later hug the liver in a buttery embrace. You can almost taste the buttery, slightly sweet, and subtly peppery notes before the first bite even lands on your tongue.
What makes this version the undisputed champion? First, we treat the liver with respect, soaking it briefly to mellow any metallic edge. Second, we coat it lightly in seasoned flour, creating a crisp, golden crust that locks in moisture. Third, we caramelize the onions slowly, allowing natural sugars to develop without burning. Fourth, we finish with a splash of butter and a sprinkle of fresh parsley that adds brightness and a hint of herbaceous perfume. Most recipes either rush the onions or overcook the liver, resulting in a texture that’s either mushy or tough. This method strikes a perfect balance, delivering a dish that’s both nostalgic and elevated.
But here’s the kicker: I’ll be honest — I ate half the batch before anyone else got a chance to try it, and I’m daring you to taste this and not go back for seconds. The secret ingredient? A pinch of garlic powder that sneaks in with the flour, adding depth without overwhelming the natural flavor of the liver. And if you think this is just another “old‑school” recipe, think again. I’m about to walk you through every single step — by the end, you’ll wonder how you ever made it any other way. Okay, ready for the game‑changer?
What Makes This Version Stand Out
- Taste: The combination of sweet caramelized onions and a buttery, pepper‑kissed crust creates a flavor profile that’s both comforting and sophisticated.
- Texture: A crisp, golden exterior gives way to a melt‑in‑your‑mouth interior, avoiding the dreaded rubbery liver texture.
- Simplicity: Only nine ingredients, all pantry staples, and a handful of steps keep the process approachable for cooks of any skill level.
- Uniqueness: The quick milk soak neutralizes bitterness, while the garlic‑infused flour adds a hidden layer of savory complexity.
- Crowd Reaction: Even the most skeptical diners (yes, the ones who think liver is a punishment) rave and ask for seconds.
- Ingredient Quality: Fresh, high‑grade beef liver and sweet onions are the stars; you’ll notice the difference the moment you bite.
- Cooking Method: The two‑stage sear‑and‑sauté technique ensures the liver never overcooks while the onions achieve perfect caramelization.
- Make‑Ahead Potential: You can prep the liver and onions ahead of time; a quick re‑heat brings back the magic.
Inside the Ingredient List
The Flavor Base
Onions are the unsung heroes of this dish. Their natural sugars, when slowly caramelized, develop a sweet, nutty depth that balances the liver’s earthy notes. If you substitute shallots, you’ll get a milder flavor, but you’ll lose the robust caramel character. Choose onions that are firm, with dry skins—any sign of sprouting indicates they’re past their prime and will add bitterness.
Fresh parsley adds a burst of color and a fresh, herbaceous finish that cuts through the richness. It’s not just garnish; the chlorophyll in parsley can actually brighten the overall palate, making each bite feel lighter. If you don’t have parsley, a sprinkle of fresh thyme or a dash of dried oregano can work, though the visual appeal will shift.
The Texture Crew
All‑purpose flour is the secret to that coveted crust. By dusting the liver lightly, you create a barrier that traps juices, ensuring the interior stays tender while the exterior turns golden. For a gluten‑free twist, substitute with rice flour or a 1:1 gluten‑free blend; the texture will be slightly lighter but still delightful.
Butter and vegetable oil combine to give you the best of both worlds: oil raises the smoke point, preventing the pan from burning, while butter adds a rich, nutty flavor that finishes the dish with a glossy sheen. If you’re watching fat intake, you can reduce butter to 1 tablespoon and increase oil proportionally, though you’ll miss some of that buttery depth.
The Unexpected Star
A pinch of garlic powder mixed into the flour may seem trivial, but it introduces a subtle aromatic note that elevates the entire dish without overwhelming the liver’s natural flavor. Fresh garlic would be too harsh and could dominate, while garlic powder distributes evenly, ensuring each bite has a whisper of garlicky warmth.
Salt and black pepper are the classic duo that brings out the flavors of the liver and onions. The key is to season the flour mixture evenly, so the seasoning adheres to the liver before it hits the pan. If you’re on a low‑sodium diet, you can cut the salt in half and let the natural flavors shine.
The Final Flourish
Beef liver itself is a powerhouse of nutrients—iron, vitamin A, and B‑vitamins—all packed into a lean protein source. The trick is selecting liver that’s bright red, firm, and free of any off‑odors. A quick tip: buy liver from a trusted butcher or a reputable grocery store where turnover is high; fresher liver means a milder taste and better texture.
A quick soak in cold milk for 10‑15 minutes can mellow any metallic taste and soften the texture, making the liver more palatable for those who are new to organ meats. If you’re dairy‑free, a brief soak in plain water with a splash of apple cider vinegar works as an alternative.
Everything's prepped? Good. Let's get into the real action...

The Method — Step by Step
Start by slicing the beef liver into ½‑inch thick strips. As you work, the bright pink flesh should look moist but not wet. Place the strips in a bowl and cover them with cold milk, letting them soak for 10‑15 minutes. This milk bath neutralizes any lingering bitterness and tenderizes the tissue, a step that many recipes skip, resulting in that dreaded metallic aftertaste. After soaking, drain and pat the liver dry with paper towels, then set aside.
While the liver rests, thinly slice the onions—about ¼‑inch rings work best. Heat 2 tablespoons of vegetable oil in a heavy skillet over medium‑low heat. Add the onions, sprinkle a pinch of salt, and let them sweat gently; this slow start draws out moisture without burning. After 5‑7 minutes, increase the heat slightly and watch the edges turn golden, then caramelized. The scent should be sweet, almost like toasted marshmallows, and that’s the moment you know they’re perfect.
Kitchen Hack: Add a splash of water (about 1 tbsp) to the pan if the onions start to stick; the steam will finish the caramelization without scorching.In a shallow dish, combine the flour, salt, black pepper, and garlic powder. Whisk them together so the seasoning is evenly distributed. Dredge each liver strip in the seasoned flour, shaking off any excess. The coating should be light—just enough to cling without forming a thick crust. This thin veil is what will give you that satisfying crunch when the liver hits the pan.
Increase the skillet heat to medium‑high and add the remaining 2 tablespoons of vegetable oil. Once the oil shimmers (you’ll see a faint ripple), lay the liver strips in a single layer, making sure not to crowd them. Overcrowding drops the pan temperature, leading to soggy rather than crisp pieces. Hear that immediate sizzle? That’s the sound of flavor forming. Cook each side for 2‑3 minutes, until the crust turns a deep, buttery gold and the interior remains pink.
When the liver is nearly done, push it to the side of the pan and add the 2 tablespoons of butter. As the butter melts, it will foam and turn a nutty amber. Spoon the butter over the liver and onions, letting it coat everything in a glossy sheen. This step is pure magic; the butter not only adds richness but also helps the caramelized onions cling to the liver.
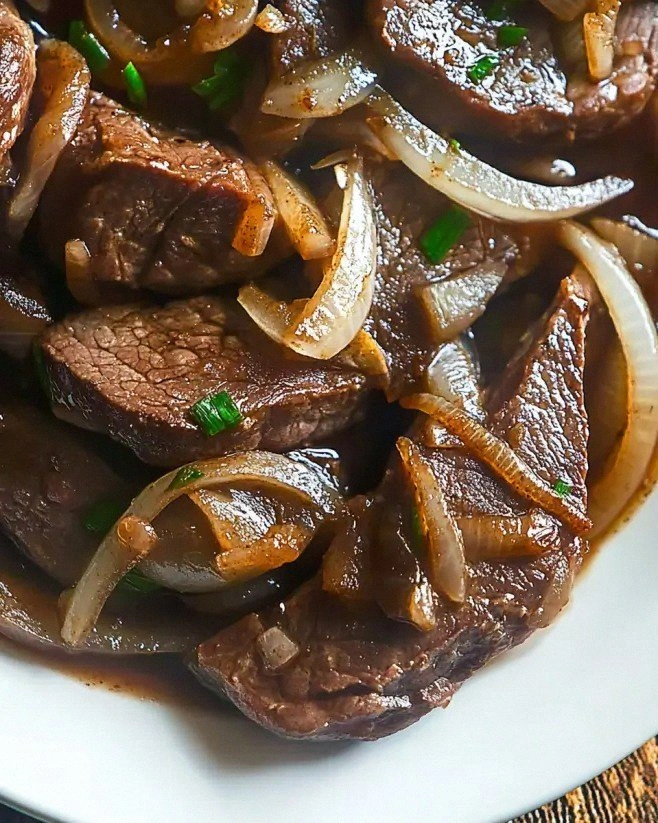
Now, fold the caramelized onions back over the liver, letting them mingle for another minute. The flavors should meld, and the pan should smell like a cozy kitchen in autumn—sweet, buttery, and slightly peppery. Taste a small piece; the liver should be tender, not rubbery, and the onions should be sweet without any bitterness.
Watch Out: Do not overcook the liver—once the crust is golden, the interior will finish cooking quickly. Overcooking turns it tough and grainy.Finish by sprinkling a generous handful of freshly chopped parsley over the top. The green specks not only add visual contrast but also a fresh, slightly peppery note that brightens the dish. Give everything a final gentle toss to coat the liver in the parsley‑butter mixture.
Transfer the liver and onions to a serving platter. Let the dish rest for two minutes; this brief pause allows the juices to redistribute, ensuring each bite is juicy. Serve immediately with crusty bread, mashed potatoes, or a simple green salad. Picture yourself pulling this out of the pan, the whole kitchen smelling incredible, and your guests leaning in for that first, unforgettable bite.
That's it — you did it. But hold on, I've got a few more tricks that'll take this to another level. Ready for the next set of insider secrets?
Insider Tricks for Flawless Results
The Temperature Rule Nobody Follows
Never start with a cold pan; pre‑heat your skillet for at least two minutes before adding oil. A hot surface sears the liver instantly, creating that coveted crust. If you’re using an electric stove, give the pan a minute extra to reach true medium‑high heat. I once tried to save time by adding the liver to a cold pan, and the result was a soggy, pale mess that tasted like boiled meat. Trust the heat, and the liver will thank you.
Why Your Nose Knows Best
Your sense of smell is the ultimate timer. When the onions start to turn amber and release a sweet aroma, you’re at the perfect caramelization point. If you notice a sharp, burnt odor, pull them off the heat immediately and deglaze with a splash of broth to rescue the flavor. Trusting your nose prevents the common mistake of “over‑caramelizing,” which can turn the onions bitter and ruin the balance.
The 5‑Minute Rest That Changes Everything
After searing, let the liver rest for about five minutes before the final toss. This short pause lets the internal juices settle, preventing them from spilling out when you cut into the meat. I’ve seen cooks slice immediately and watch the juices run like a mini waterfall, leaving the liver dry. A brief rest keeps every bite moist and succulent.
Butter‑Basting Secrets
When you add butter, tilt the pan slightly and use a spoon to baste the liver continuously. This technique coats the meat in a glossy, flavorful layer and ensures even cooking. A friend once skipped basting and ended up with unevenly browned pieces; the difference is night and day.
Seasoning Layers, Not Just One
Season the flour mixture, the liver itself, and finish with a pinch of salt after plating. Each layer builds depth, so the final dish isn’t flat. If you only season once, you’ll miss out on that complex, layered flavor that makes this recipe unforgettable.
Creative Twists and Variations
This recipe is a playground. Here are some of my favorite ways to switch things up:
Apple‑Cider Glaze
Swap the butter finish for a splash of apple‑cider reduction. The tangy sweetness pairs beautifully with the caramelized onions, adding a bright, autumnal twist. Ideal for a holiday dinner.
Spicy Chipotle Kick
Add a teaspoon of chipotle powder to the flour mixture and finish with a drizzle of chipotle aioli. The smoky heat elevates the dish without overwhelming the liver’s natural flavor. Perfect for those who love a little fire.
Mushroom Medley
Stir in a handful of sliced cremini or shiitake mushrooms with the onions during the caramelization stage. The earthy mushrooms add depth and turn the plate into a hearty, rustic feast.
Herb‑Infused Oil
Infuse the vegetable oil with rosemary and thyme before heating. The aromatic oil imparts a subtle herbaceous note that complements the parsley garnish, creating a layered herb profile.
Creamy Mustard Sauce
After plating, drizzle a quick mustard cream sauce (mix Dijon mustard, heavy cream, a splash of white wine, and a pinch of sugar). The tangy cream balances the richness and adds a velvety finish.
Storing and Bringing It Back to Life
Fridge Storage
Place leftovers in an airtight container and store them in the refrigerator for up to 3 days. The liver will continue to develop flavor, but the texture may soften slightly. Reheat gently to preserve tenderness.
Freezer Friendly
Cool the dish completely, then transfer to a freezer‑safe bag or container. It freezes well for up to 2 months. When ready to use, thaw overnight in the fridge and reheat using the stovetop method below.
Best Reheating Method
To revive the dish, heat a tablespoon of oil in a skillet over medium heat, add a splash of water (about 2 tbsp) to create steam, and gently warm the liver and onions for 3‑4 minutes. The added moisture restores the glossy coating and prevents the liver from drying out. Serve immediately for best results.