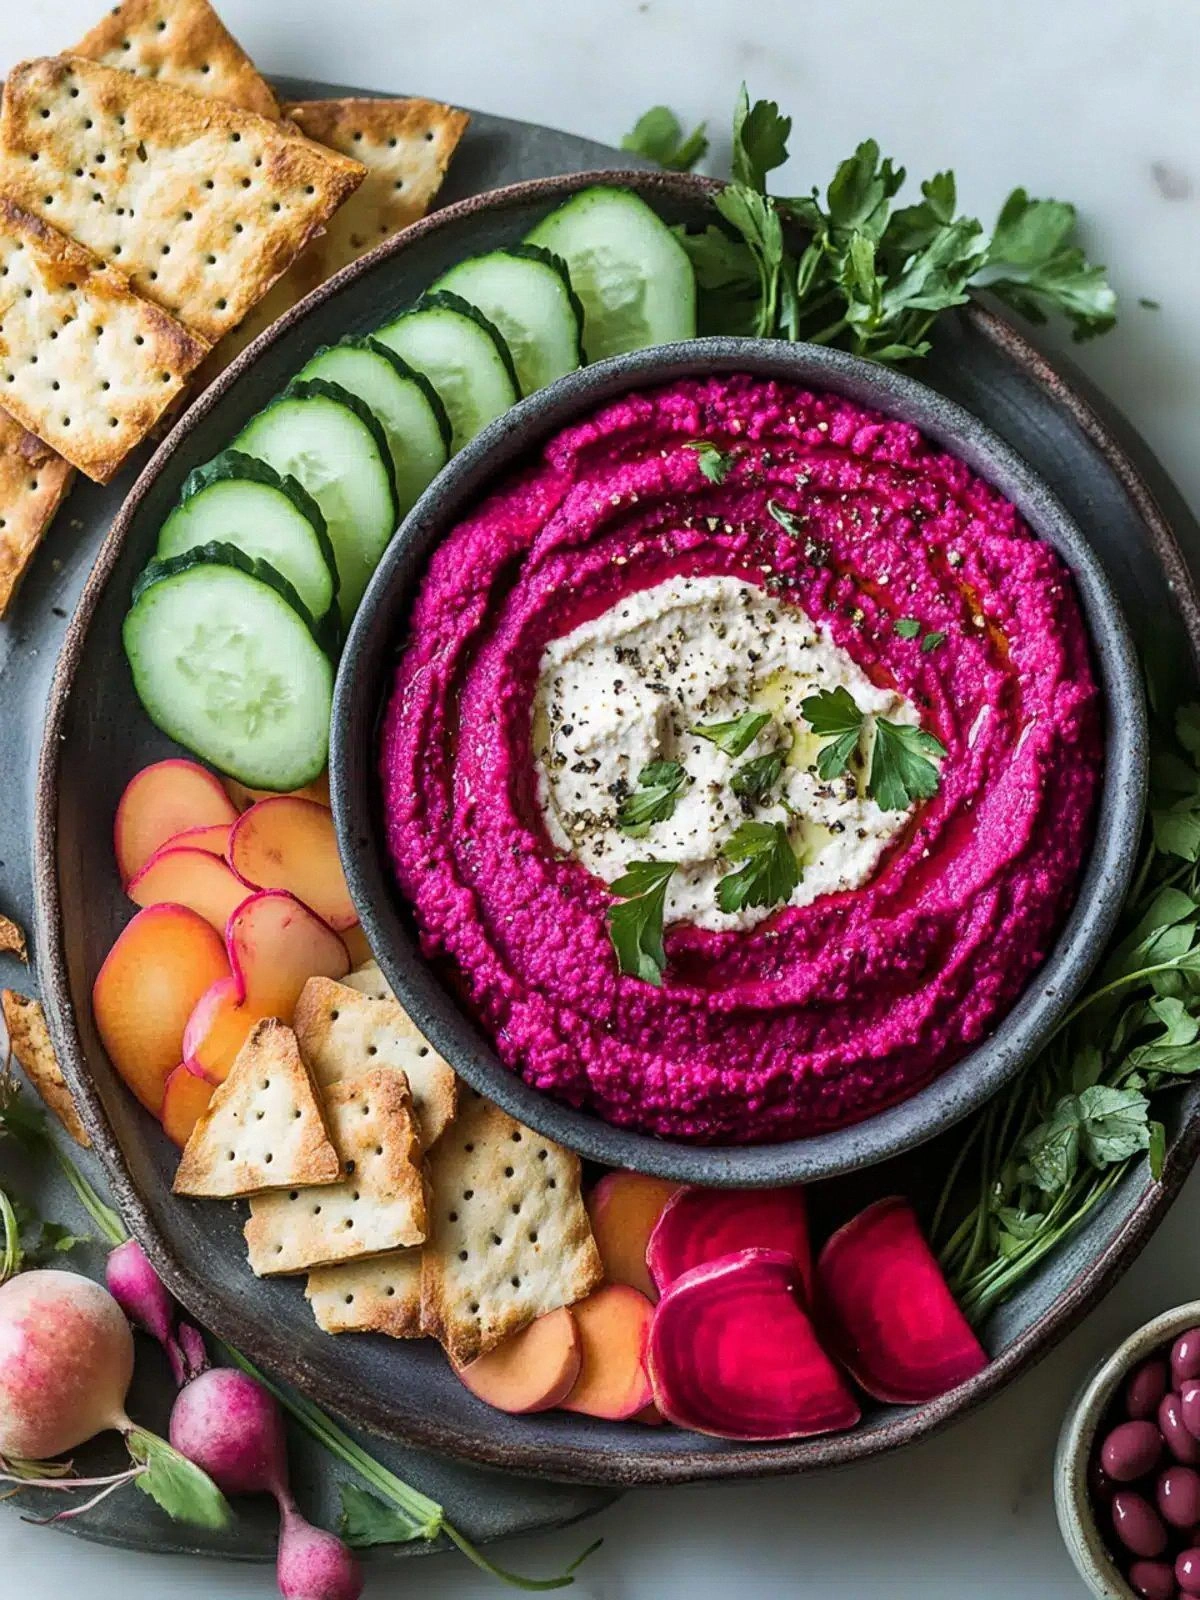
I still remember the night I tried to impress my friends with a “simple” dip, only to end up with a sticky, unappetizing mess that looked like a beet‑colored disaster zone. The chickpeas were over‑blended, the beet was under‑roasted, and the lemon had been forgotten until the last minute. That chaos sparked a midnight epiphany: what if I could turn that culinary catastrophe into a show‑stopping platter that would make everyone gasp, “I dare you to taste this and not go back for seconds?”
Picture the moment you pull the platter out of the fridge: the air is tinged with the sweet, earthy perfume of roasted beet, the glossy sheen of tahini, and a citrusy zing that almost sings. The sound of the pita chips crunching under the first bite is a crisp counterpoint to the velvety texture of the hummus, and the sight of vibrant paprika dusting the top feels like a sunrise on a plate. The first spoonful is a revelation—rich, earthy, bright, and surprisingly light, all at once. And the best part? The whole process takes less than 30 minutes, so you can focus on mingling rather than marinating.
What sets this version apart is that it’s not just another hummus recipe; it’s a carefully balanced symphony of flavors and textures that elevate every bite. I’ve combined the deep sweetness of roasted beet with the nutty crunch of chickpeas, then softened it all with tahini and brightened it with lemon. The result is a dip that coats the palate like velvet, yet offers a satisfying bite that shatters like thin ice when you pair it with crunchy veggies. If you’ve ever struggled with bland hummus, you’re not alone—this is the fix you’ve been missing.
And here’s the twist that most people overlook: adding a splash of extra virgin olive oil and a dusting of smoked paprika not only enhances flavor but also creates a visual wow factor that will have your guests asking for the recipe. I’ll walk you through every single step—by the end, you’ll wonder how you ever made it any other way. Let’s dive in.
What Makes This Version Stand Out
- Taste: The beet’s natural sweetness cuts through the earthiness of chickpeas, creating a flavor profile that feels both familiar and adventurous.
- Texture: The blend is silky smooth, yet the hummus still holds a subtle bite thanks to the roasted beet’s slight crunch.
- Color: A vibrant, jewel‑red hue that instantly signals freshness and makes the platter a centerpiece.
- Ingredient Quality: Using a single, whole roasted beet instead of canned puree keeps the dish authentic and nutrient‑dense.
- Make‑Ahead Potential: The hummus stays fresh for up to 3 days in the fridge, and the beet can be roasted in advance.
- Crowd Reaction: Friends rave about the unexpected sweetness, and the dip pairs perfectly with both veggies and pita.
- Health Boost: Packed with plant‑based protein, fiber, and antioxidants, it’s a guilt‑free indulgence.
- Versatility: The base can be customized with herbs, spices, or even a touch of cayenne for heat.
Alright, let's break down exactly what goes into this masterpiece…
Inside the Ingredient List
The Flavor Base
Chickpeas are the backbone of any hummus, providing a neutral canvas that absorbs the beet’s sweetness. Choosing a high‑protein, low‑fat variety like “Navy” or “Garbanzo” ensures a creamy texture without excess oil. If you skip them, the dip will lose its body and become a watery salad dressing. For a vegan twist, replace chickpeas with white beans or lentils, but keep in mind the flavor will shift slightly.
The Texture Crew
Tahini brings a silky, nutty richness that balances the beet’s earthiness. A tablespoon of olive oil can be added to thin the hummus if it feels too thick after blending. If you’re allergic to sesame, tahini can be substituted with sunflower seed paste, though the flavor profile will be noticeably different. When selecting olive oil, a light, fruity variety will complement the citrus without overpowering the beet’s subtle sweetness.
The Unexpected Star
Roasted beet is the secret weapon that elevates this hummus from ordinary to unforgettable. Roasting caramelizes the natural sugars, giving the beet a deep, sweet flavor that pairs beautifully with lemon juice. If you can’t find fresh beets, a small jar of roasted beet puree works, but fresh is always better for texture. A quick tip: keep the beet skins on during roasting to lock in moisture and reduce prep time.
The Final Flourish
Fresh herbs like parsley or cilantro add brightness and a burst of color to the finished dish. A pinch of smoked paprika or cayenne pepper introduces a subtle heat that balances the beet’s sweetness. When plating, drizzle a small amount of extra virgin olive oil over the hummus; this not only enhances flavor but also gives the dip a glossy, inviting look. If you’re serving this at a party, arrange the veggies and pita chips in a circular pattern to create an interactive, self‑service style.
Everything's prepped? Good. Let's get into the real action…
The Method — Step by Step
- Step 1: Prep the Beet – If you’re starting from a fresh beet, wash it thoroughly, trim the tops and tails, and roast it in a preheated oven at 400°F (200°C) for about 35 minutes, or until tender. The key is to leave the skin on; it protects the beet from drying out and makes for an easier peel. Once roasted, let it cool enough to handle, then peel and chop into bite‑sized cubes. This step ensures a smooth blend and a natural sweetness that’s hard to replicate with canned versions.
- Step 2: Drain the Chickpeas – Drain the can of chickpeas and reserve a small cup of the liquid. That liquid can be used to thin the hummus if it’s too thick after blending. Rinsing the chickpeas under cold water also helps remove excess sodium and gives the hummus a cleaner flavor. If you prefer a smoother texture, you can soak the chickpeas overnight in water before cooking them until tender.
- Step 3: Blend the Base – Add the chickpeas, roasted beet cubes, tahini, lemon juice, and minced garlic to a high‑speed blender or food processor. Pour in about a quarter cup of the reserved chickpea liquid to help the mixture emulsify. Blend on high for 60–90 seconds until the mixture is silky and smooth. If the hummus is too thick, add more liquid a tablespoon at a time until you reach your desired consistency. The goal is a spreadable texture that’s thick enough to hold its shape on a platter but light enough to drizzle.
- Step 4: Season to Taste – Taste the hummus and add salt, pepper, or more lemon juice as needed. The beet’s natural sweetness may reduce the need for extra salt, but a pinch of sea salt can bring out the flavors. If the hummus feels too tart, a small splash of olive oil can mellow it. Watch out for the texture: if the hummus becomes too watery, a few more tahini or a pinch of ground cumin can thicken it.
- Step 5: Transfer to Serving Bowl – Scoop the hummus into a shallow, wide bowl for easy spreading. The bowl’s shallow depth allows the hummus to cool quickly, preserving its bright color. If you like a glossy finish, drizzle a teaspoon of extra virgin olive oil over the top and swirl it gently. This step also gives the hummus a subtle sheen that makes it look restaurant‑grade.
- Step 6: Garnish and Plate – Roughly chop fresh parsley or cilantro and scatter it over the hummus. Add a light dusting of paprika for color and a pop of heat. Arrange the veggie sticks and pita chips around the bowl in a circular pattern, inviting guests to dip. The visual layout should feel like a garden, with the hummus at the center and the veggies acting as petals.
- Step 7: Serve Immediately – The hummus is best served at room temperature, but if you need to keep it cold, place the bowl in the fridge for no longer than 30 minutes before serving. The flavor profile remains vibrant, and the color stays vivid. If you’re preparing ahead, cover the bowl tightly with plastic wrap to prevent the hummus from drying out.
That's it — you did it. But hold on, I've got a few more tricks that'll take this to another level. Let’s dive into insider tricks that will keep your hummus flawless every time.
Insider Tricks for Flawless Results
The Temperature Rule Nobody Follows
Many people think the hummus can be made at room temperature, but the key to a silky texture is blending the chickpeas while they’re slightly warm. Warm chickpeas release their starches, which helps the tahini emulsify more smoothly. If you’re in a hurry, simply microwave the chickpeas for 20–30 seconds before blending. This small temperature tweak can make the difference between a grainy dip and a velvet‑smooth spread.
Why Your Nose Knows Best
Don’t underestimate the power of aroma. As soon as the beet hits the blender, the sweet, earthy scent will start to fill the kitchen. If you notice a faint metallic tang, it’s a sign that the beet may have been overcooked or the chickpeas were too old. Trust your nose: a fresh, sweet scent is the hallmark of a perfect hummus.
The 5-Minute Rest That Changes Everything
After blending, let the hummus sit for exactly five minutes before seasoning. This pause allows the flavors to meld and the tahini to fully emulsify. If you rush this step, the hummus can taste raw or overly tart. The five‑minute rest also gives you a chance to adjust the consistency with a splash of liquid or a pinch of salt.
Keep It Fresh With a Splash of Water
If you’re storing the hummus for later, add a tiny splash of water before reheating. The water creates steam that rehydrates the hummus, preventing it from becoming dry or rubbery. Stir in a tablespoon of water and warm gently on the stove or in the microwave, then give it a quick whisk to restore its silky texture.
Use a High‑Quality Blender
A powerful blender or food processor makes a noticeable difference in the final product. A cheap blender may leave behind small chickpea bits, resulting in a grainy texture. A high‑speed model ensures a uniform blend, especially when working with dense ingredients like roasted beet. If you don’t have a premium blender, run the mixture through a fine mesh sieve for a smoother finish.
Creative Twists and Variations
This recipe is a playground. Here are some of my favorite ways to switch things up:
Smoky Chipotle Beet Hummus
Swap the smoked paprika for chipotle powder and add a splash of adobo sauce. The result is a smoky, slightly spicy dip that pairs beautifully with corn tortilla chips. The chipotle also gives a deeper color that’s perfect for a fall gathering.
Herb‑Infused Beet Hummus
Blend in a handful of fresh basil or mint for a refreshing, aromatic twist. These herbs complement the beet’s sweetness and add a subtle peppery note. Serve alongside cucumber slices for a Mediterranean feel.
Roasted Red Pepper Beet Hummus
Add a roasted red pepper to the blend for a sweeter, smoky flavor. The pepper’s bright color adds visual appeal, and its mild heat balances the beet’s earthiness. This version is especially great for a summer potluck.
Spicy Ginger Beet Hummus
Grate a small piece of fresh ginger into the mixture for a zesty kick. Ginger’s peppery warmth pairs wonderfully with the beet’s natural sweetness. Pair this with carrot sticks for a crunchy, healthful snack.
Vegan Cheese‑Free Beet Hummus
Omit the tahini and replace it with a tablespoon of nutritional yeast for a cheesy, umami flavor. The yeast also adds a subtle nutty undertone, keeping the dip creamy. This variation is perfect for those with sesame allergies.
Beet Hummus with Pesto Drizzle
Finish the hummus with a swirl of basil pesto for a herbaceous, savory layer. The pesto’s oil content also helps the hummus stay moist. This twist is ideal for a brunch spread, especially when served with toasted baguette slices.
Storing and Bringing It Back to Life
Fridge Storage
Store the hummus in an airtight container in the refrigerator for up to three days. Cover the surface with a thin layer of olive oil to keep it from drying out and to preserve its bright color. When ready to serve, let it sit at room temperature for 10–15 minutes to bring back its silky texture.
Freezer Friendly
For longer storage, freeze the hummus in a freezer‑safe container or a zip‑lock bag, removing as much air as possible. It will keep for up to two months. Thaw overnight in the refrigerator, then stir in a splash of water or olive oil to restore its smoothness.
Best Reheating Method
To reheat, place the hummus in a small saucepan over low heat, stirring constantly until warmed through. Alternatively, microwave in 30‑second bursts, stirring after each interval. Add a tablespoon of water or a drizzle of olive oil to keep it moist and silky.