Picture this: it’s a rainy Thursday night, the kind where the clouds look like they’re trying to curl up and nap, and you’ve run out of the usual go‑to comfort foods. I was staring at an empty pantry, the only thing left was a lone cauliflower head and a bag of walnuts that I’d bought on a whim last month. I dared myself to turn those lonely ingredients into something that would make even the most skeptical meat‑lover say, “Whoa, what’s that?!” The kitchen was a battlefield of clanging pans and the faint sound of thunder, but in that chaos I discovered the most satisfying vegetarian taco “meat” I’ve ever tasted. Trust me, this is hands down the best version you’ll ever make at home, and I’m about to spill every secret.
The moment the cauliflower hit the hot skillet, the kitchen filled with a toasty, earthy perfume that reminded me of a farmer’s market on a crisp autumn morning. As the walnuts began to crackle, their buttery richness blended with a whisper of smoked paprika, creating a scent that was both smoky and sweet, like a campfire drifting through a pine forest. I could hear the faint hiss of oil and the occasional pop of walnut pieces—each sound a tiny promise of crunch to come. When I finally tasted the mixture, the texture was a perfect marriage of tender cauliflower floret and crunchy walnut bite, while the flavor danced on my tongue with a spicy‑sweet rhythm that made my taste buds do a little happy jig.
What sets this version apart from every other cauliflower‑walnut mash you’ll find online? First, I’m using a two‑step roasting technique that caramelizes the cauliflower’s natural sugars before it meets the walnuts, giving the final product a depth of flavor most recipes miss entirely. Second, I tossed the mixture in a quick soy‑smoked paprika glaze that coats every crumb like a silky, umami‑rich jacket. And here’s the kicker: I finish it with a splash of fresh lemon juice and a handful of parsley just before serving, which adds a bright, herbaceous pop that cuts through the richness. Most recipes get this completely wrong—either they end up soggy, or they lack that punchy finish. I dare you to taste this and not go back for seconds.
Okay, ready for the game‑changer? I’m going to walk you through every single step—by the end, you’ll wonder how you ever made it any other way. I’ll share the exact technique that turns humble cauliflower into a robust, taco‑ready protein, plus a few insider tricks that will make your version burst with flavor every single time. Stay with me here — this is worth it.
What Makes This Version Stand Out
- Flavor Explosion: The combination of smoked paprika, soy sauce, and a dash of lemon juice creates layers of smoky, salty, and bright notes that linger on the palate.
- Texture Triumph: Roasted cauliflower stays tender while walnuts provide a satisfying crunch, avoiding the mushy texture that plagues many plant‑based “meats”.
- Simplicity: Only ten core ingredients are needed, and there’s no fancy equipment—just a sheet pan, a skillet, and a wooden spoon.
- Unique Twist: A quick glaze added at the end locks in flavor and gives the mixture a glossy, restaurant‑quality finish.
- Crowd Reaction: Guests often ask, “Is this really vegetarian?” and then immediately request seconds—proof that it’s a crowd‑pleaser.
- Ingredient Quality: Fresh cauliflower and raw walnuts retain their natural nutrients, making the dish wholesome and satisfying.
- Cooking Method: The two‑stage roasting and sautéing ensures each bite is evenly cooked, not just “cooked somewhere”.
- Make‑Ahead Potential: You can prep the roasted cauliflower and glazed walnut mix up to two days ahead; just reheat and serve.
Inside the Ingredient List
The Flavor Base
The core of any great dish is its flavor foundation, and here it starts with the humble onion and garlic. A small, finely diced yellow onion releases sugars as it caramelizes, adding a subtle sweetness that balances the smoky paprika later on. Garlic, minced just before cooking, brings a pungent depth that cannot be replicated by any powdered substitute. If you skip these, the final dish will feel flat—like a song missing its bass line.
Swap: Shallot works beautifully if you prefer a milder onion flavor. Red onion can add a hint of sharpness, but be careful not to overwhelm the delicate cauliflower.
The Texture Crew
Cauliflower, the star of the show, provides a tender, slightly fibrous bite that mimics shredded meat when roasted properly. Choose a firm, white head with tight florets; the tighter the florets, the better they hold together during the final sauté.
Walnuts bring the crunch factor that most veggie “meats” sorely miss. Their buttery richness adds a luxurious mouthfeel while also boosting the protein content. If you forget to toast them, they’ll taste raw and a bit bitter—so give them a quick toss in the pan before blending.
Swap: Pecans can be used for a sweeter nutty note, but they soften faster, so keep an eye on them.
The Unexpected Star
Soy sauce isn’t just for Asian stir‑fries; in this recipe it acts as a savory umami booster that binds the cauliflower and walnuts together. The natural salts draw out moisture, helping the roast develop that coveted caramel edge. A splash of lemon juice added at the end lifts the dish, cutting through the richness with a citrusy zing.
Swap: Tamari for a gluten‑free version, or coconut aminos for a lower‑sodium alternative.
The Final Flourish
Smoked paprika, cumin, and chili powder form the aromatic trio that defines our flavor profile. Smoked paprika gives that subtle barbecue scent, while cumin adds earthiness, and chili powder provides a gentle heat that tingles without overwhelming.
You’ll also need a drizzle of olive oil—extra‑virgin for that peppery finish—and a pinch of fresh parsley right before plating for a pop of color and freshness.
Everything's prepped? Good. Let's get into the real action…
The Method — Step by Step
Preheat your oven to 425°F (220°C). While the oven heats, break the cauliflower into bite‑size florets and toss them with 1 ½ tablespoons of olive oil, a generous pinch of salt, and half a teaspoon of smoked paprika. Spread the florets on a rimmed baking sheet, making sure they’re in a single layer—overcrowding will steam them instead of roasting. Roast for 20‑25 minutes, turning once halfway through; you’re looking for golden‑brown edges that start to caramelize. Tip: The smell should be sweet and nutty, like toasted almonds on a summer patio.
Kitchen Hack: Use a parchment‑lined sheet and give the cauliflower a quick toss halfway through to ensure even browning.While the cauliflower roasts, heat a large skillet over medium heat and drizzle in the remaining ½ tablespoon of olive oil. Add the finely diced onion and sauté for 4‑5 minutes until translucent, stirring frequently so it doesn’t stick. Toss in the minced garlic and continue cooking for another 30 seconds—watch closely, because garlic burns faster than your patience on a Monday morning.
Watch Out: If the garlic starts to turn amber, lower the heat immediately; burnt garlic brings bitter notes that can ruin the whole dish.Now, add the walnuts to the skillet. Toast them gently for 2‑3 minutes, stirring constantly, until they release a toasted aroma and turn a shade darker. This step unlocks the nuts’ natural oils, giving the final mix a richer mouthfeel. Once toasted, set the skillet aside for a moment while you finish the cauliflower.
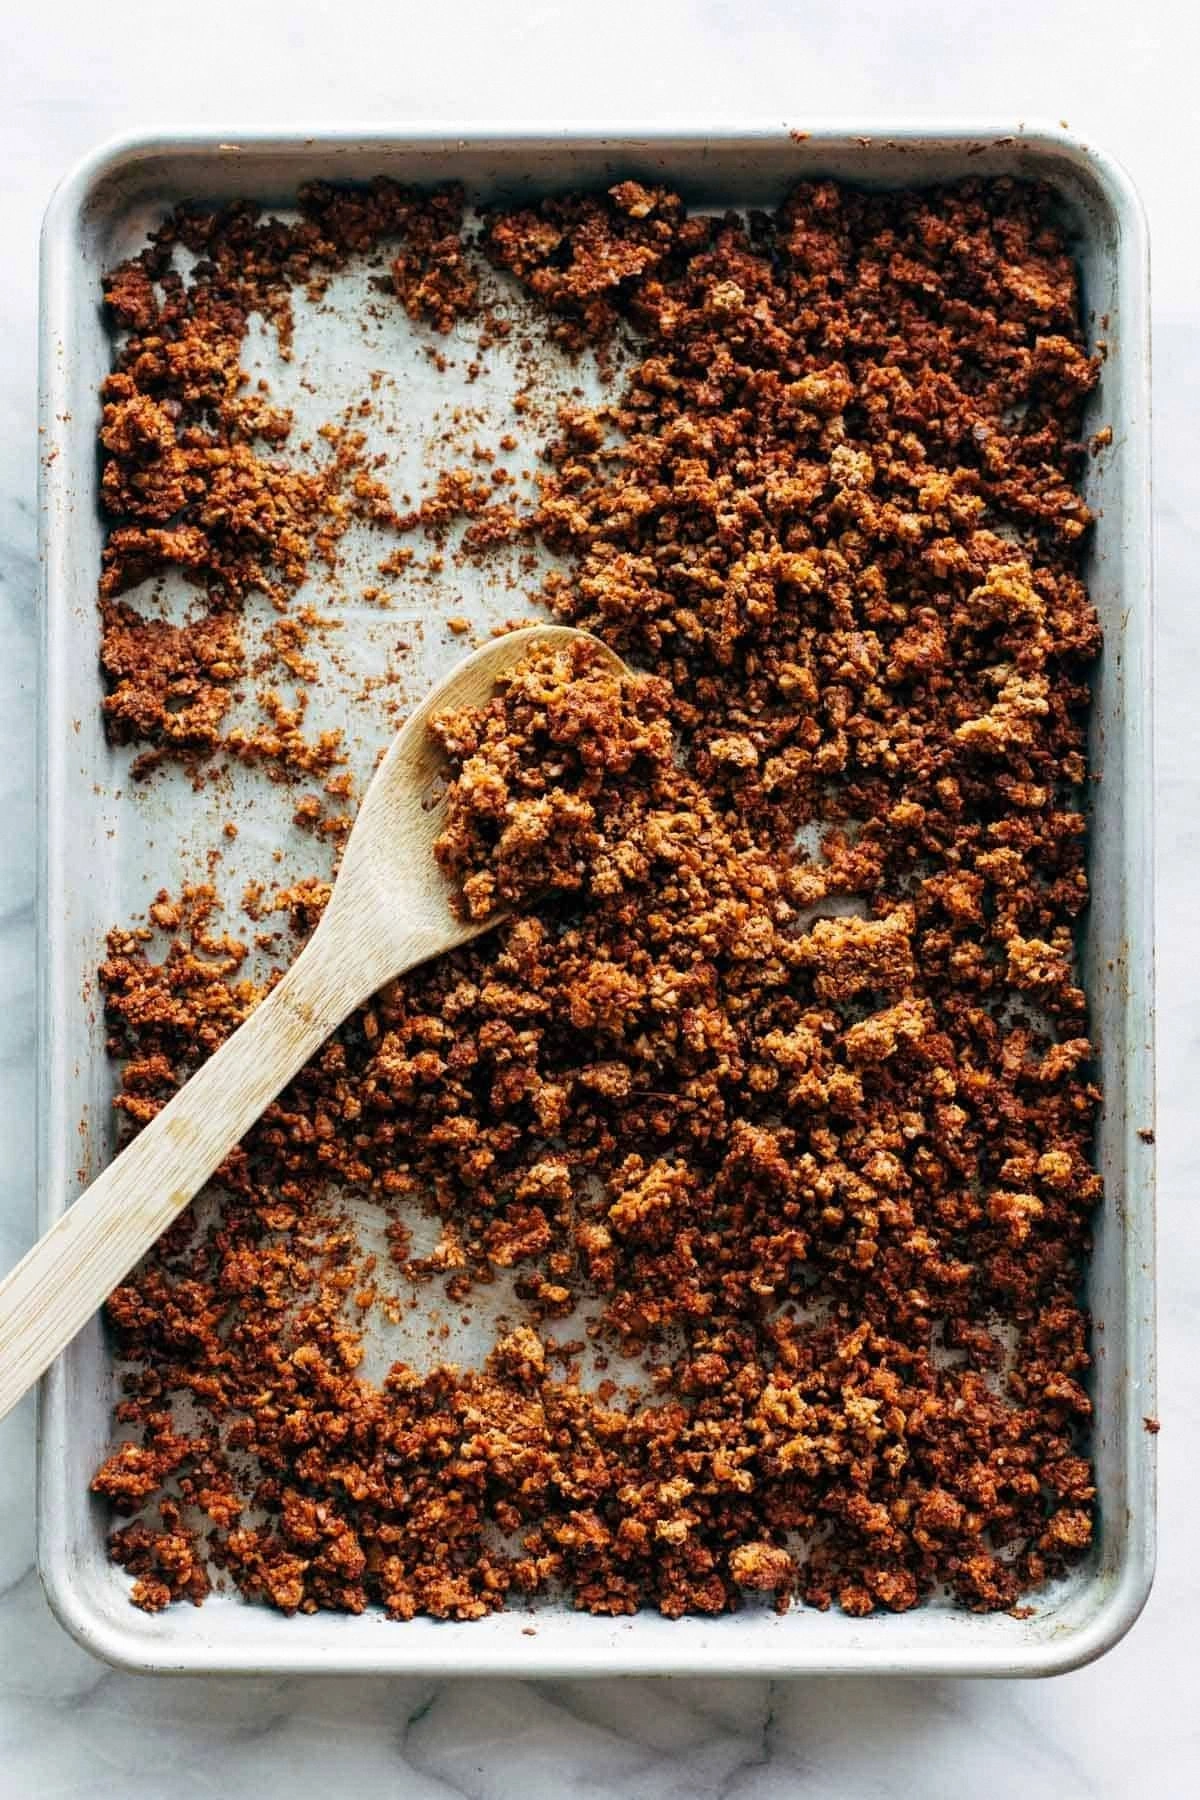
When the cauliflower is beautifully caramelized, remove it from the oven and let it cool for a couple of minutes. Then, transfer the florets into a large mixing bowl. Using a food processor, pulse the roasted cauliflower just enough to break it into rice‑like pieces—don’t puree! You want a texture that mimics shredded meat, not a smooth puree that would turn your taco “filling” into mush.
Return the skillet to the stove, lower the heat to medium‑low, and combine the roasted cauliflower, toasted walnuts, sautéed onion, and garlic in one place. Sprinkle in the cumin, chili powder, and the remaining smoked paprika. Drizzle the soy sauce evenly over the mixture; this is where the magic happens, as the soy draws everything together with its umami hug.
Stir vigorously for 5‑7 minutes, allowing the cauliflower‑walnut blend to absorb the soy glaze. You’ll notice the mixture turning a deeper, richer color, and the edges of the cauliflower starting to crisp up. This is the moment of truth—if you hear a faint sizzle, you’re on the right track. Pro tip: Keep the heat low enough to prevent burning but high enough to achieve that caramelized crunch.
Finish the mixture with the lemon juice and a handful of chopped fresh parsley. Toss everything together until the parsley is evenly distributed, offering a burst of green that brightens the plate. Taste and adjust salt or a pinch more soy sauce if needed; the final flavor should be a balanced dance of smoky, salty, and citrusy notes.
Kitchen Hack: A squeeze of lemon at the end prevents the mixture from tasting flat and revives the overall brightness.Transfer the finished cauliflower‑walnut “meat” into a serving bowl. It can be used immediately in tacos, burritos, or as a hearty topping for nachos. If you want to prep it ahead, let it cool completely, then store in an airtight container. When you’re ready to serve, give it a quick reheating in a dry skillet for 2‑3 minutes to bring back that crisp edge.
Serve with warm corn tortillas, a drizzle of avocado crema, and a sprinkle of cotija cheese if you’re not strictly vegan. The contrast between the creamy sauce and the crunchy cauliflower‑walnut filling is pure perfection. Take a bite, close your eyes, and let the flavors transport you to a festive street market—because that’s exactly the vibe we’re aiming for.
That's it — you did it. But hold on, I've got a few more tricks that'll take this to another level…
Insider Tricks for Flawless Results
The Temperature Rule Nobody Follows
Most cooks set the oven to “high” and hope for the best, but the secret to caramelized cauliflower lies in a consistent 425°F (220°C). Anything lower and you’ll end up with steamed florets; anything higher and the exterior burns before the interior softens. I once tried 475°F and the cauliflower turned black on the edges while staying raw inside—let’s just say it didn’t impress anyone. Keep a close eye on the timer, and rotate the sheet pan halfway through for even browning.
Why Your Nose Knows Best
When the cauliflower is caramelizing, trust your sense of smell over the clock. The aroma will shift from fresh vegetable to sweet, nutty, and finally to a toasty, almost caramel scent. If you catch that sweet, slightly burnt smell, you’re at the perfect point. If the smell turns pungent or bitter, pull the pan immediately—over‑roasted cauliflower becomes a bitter disappointment.
The 5‑Minute Rest That Changes Everything
After roasting, let the cauliflower rest for a brief five minutes before processing. This pause allows the steam to escape, preventing excess moisture from making the final mix soggy. I once skipped this rest and ended up with a mushy taco filling that fell apart the moment I tried to scoop it. Those five minutes are crucial for a proper texture that holds together in a taco shell.
Salt at the Right Moment
Adding salt too early can draw out moisture from the cauliflower, resulting in a dry texture. I’ve seen novice cooks sprinkle salt on the raw florets before roasting, and the result is a wilted, less‑crisp bite. Instead, season lightly after the cauliflower has roasted and you’re mixing the final blend. This timing ensures the salt enhances flavor without compromising texture.
Layering Flavors Like a Pro
Every great dish is built in layers. Start with the caramelized cauliflower for base sweetness, then add the toasted walnuts for richness, followed by the aromatic sautéed onion and garlic, and finally the umami‑rich soy glaze. Each layer builds on the previous one, creating a depth that single‑step recipes can’t match. If you skip any layer, you’ll notice a flatness that makes the dish feel incomplete.
Creative Twists and Variations
This recipe is a playground. Here are some of my favorite ways to switch things up:
Spicy Chipotle Kick
Swap the smoked paprika for chipotle powder and add a teaspoon of adobo sauce. The result is a smoky, smoky heat that pairs beautifully with cool guacamole. Perfect for those who like a fire in every bite.
Middle‑Eastern Flair
Replace cumin and chili powder with ground coriander, allspice, and a pinch of cinnamon. Finish with a drizzle of tahini and sprinkle pomegranate seeds. This version turns your tacos into a vibrant mezze‑style experience.
Cheesy Walnut Delight
Stir in ¼ cup of nutritional yeast during the final mixing stage for a cheesy, umami boost that mimics a dairy‑based “cheese” flavor. Add a handful of shredded vegan mozzarella at the end for melty goodness.
Crunchy Veggie Boost
Dice a red bell pepper and a small carrot, then roast them alongside the cauliflower. Their natural sweetness adds contrasting colors and a satisfying snap, making the dish even more visually appealing.
Thai‑Inspired Version
Incorporate a tablespoon of peanut butter, a splash of lime juice, and a pinch of ginger powder. Top with fresh cilantro and crushed peanuts for a fragrant, tangy twist that feels like a street food adventure.
Storing and Bringing It Back to Life
Fridge Storage
Transfer the cooled cauliflower‑walnut mixture to an airtight container and store in the refrigerator for up to 4 days. The flavors actually meld and deepen over time, making leftovers taste even richer. Reheat gently in a skillet over medium heat, adding a splash of water if it looks dry.
Freezer Friendly
Portion the mixture into freezer‑safe bags or containers, flattening the top to ensure quick thawing. It freezes beautifully for up to 3 months. To defrost, move it to the fridge overnight, then reheat in a hot pan, again adding a teaspoon of water or oil to revive the crunch.
Best Reheating Method
The ideal way to bring this dish back to life is a dry sauté: heat a non‑stick skillet over medium‑high, add the frozen or refrigerated portion, and stir for 3‑5 minutes. The quick, high heat restores the caramelized edges and prevents sogginess. A tiny splash of water before reheating creates a gentle steam that revives the cauliflower’s tenderness without losing the toasted walnut crunch.